Each EMG system stores its data in its own format,
unreadable by standard programs, such as the Microsoft Office programs.
The Cross Neuro Database program has an automatic Import function that scans your EMG systems data files
and imports data, and for some systems also curves, into a SQLite, MySQL or MS-SQL database.
Once in the database, data extraction, statistics and result presentation possibilities are almost unlimited.
The built-in Data Mining features (search and filter) presents extracted data, curves and graphs in MS-Excel® and MS-PowerPoint®.
Cross Neuro Database is compatible with the following EMG systems:
- Keypoint®Net
- Keypoint®Classic
The following data is Imported:
Keypoint.Net
- Patient Data including Comments fields
- Motor Sites and Segments. Note: MNCS Tests marked as "Separate Test" are NOT imported.
- Sensory Sites and fSegments. Note: SNCS Tests marked as "Separate Test" are NOT imported.
- F-Wave Summary Data. Note: Individual F-Wave data are NOT imported.
- MUP Summary Data
- MUP Individual Data
- IP Summary Data
- IP Individual Data
- H-Reflex Summary Data
- Blink-Reflex Data
- Voluntary SFEMG Data
- SEP Data
- VEP Data
- BAEP Data
Note that Keypoint.Net Curves are not supported.
The limitations are defined by Keypoint.Net KPIS and not by Cross Neuro Database.
Keypoint.Classic
- Patient Data
- Data from all Tests, except: Oscilloscope and IOM
- Curves from all Tests, except: Oscilloscope and IOM
Visit
Order and order the license type you need.
You will receive a Product Key in a mail, required to activate the program.
Ensure to be logged in to Windows as the user who is going to use the program,
since the installation/activation is done per user.
This account must have Administrative rights during installation.
3) Decide on Database Engine
Before running the Cross Neuro Database program,
it may be necessary to install a local database or connect to an existing database server.
Several database engines are supported by Cross Neuro Database.
Choose database engine and download neccessary software modules from here.
Access to multiple database engines may be set up in Cross Neuro Database, but only one at the time will be used during Import and Data Mining.
Typically only one database is used.
SQLite does not require any installation of a Database Engine.
A SQLite Database is just one single file, created by Cross Neuro Database.
A MySQL server program and a ODBC driver for MySQL needs to be installed.
MySQL may be installed locally or on a remote server.
Plan your configuration here.
The ODBC driver must be installed on each client.
Install MySQL server instructions.
Install ODBC driver for MySQL instructions.
5) Install Cross Neuro Database
The follow steps are required to install and activate Cross Neuro Database:
- Download the Cross Neuro Database installer package from Download
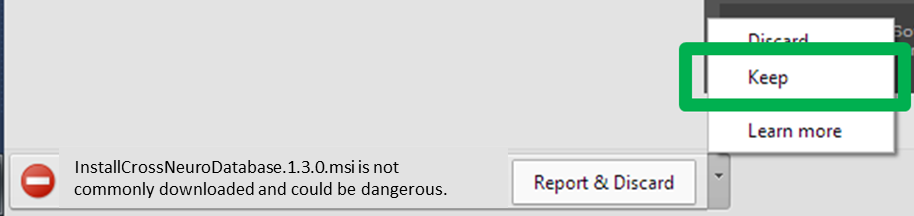
Some web browsers will warn about a downloaded installer EXE-file for safety reasons.
Confirm and accept to keep the downloaded file. In Google Chrome you need to click the 'Keep' alternative.
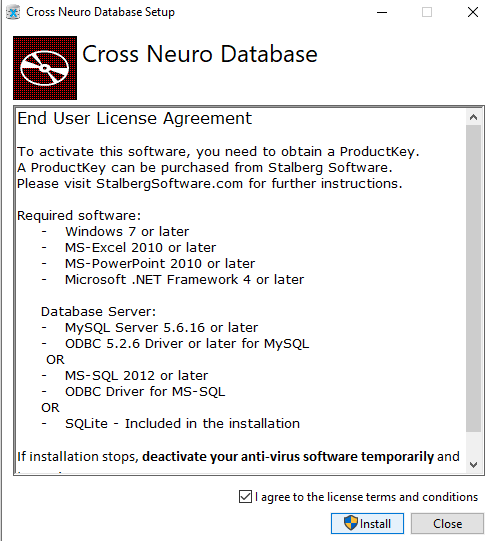
- Some Anti-virus programs will not allow all installer programs to run properly. Disable your Virus-program temporarily during installation of Cross Neuro Database.
- Click on the downloaded file to start the installation procedure.
- Follow the screen instructions
- After completed installation, start Cross Neuro Database from the double clicking on the desktop icon

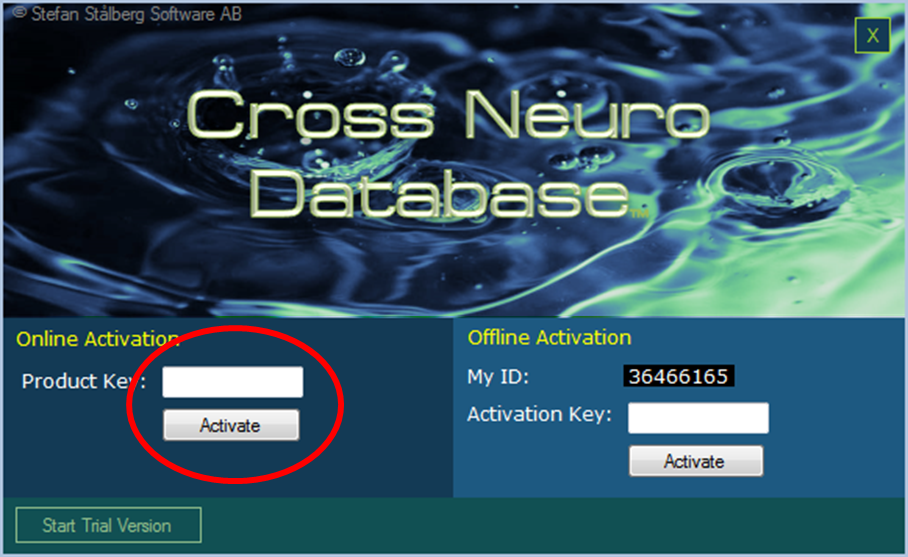
At first startup after installation, the Activation window is seen.
To continue, the program must first be Activated using either Online or Offline activation.
-
Online Activation may be used if Internet is available.
Insert the Product Key you received from Stalberg Software, in the lower left area and click [Activate] just below.
-
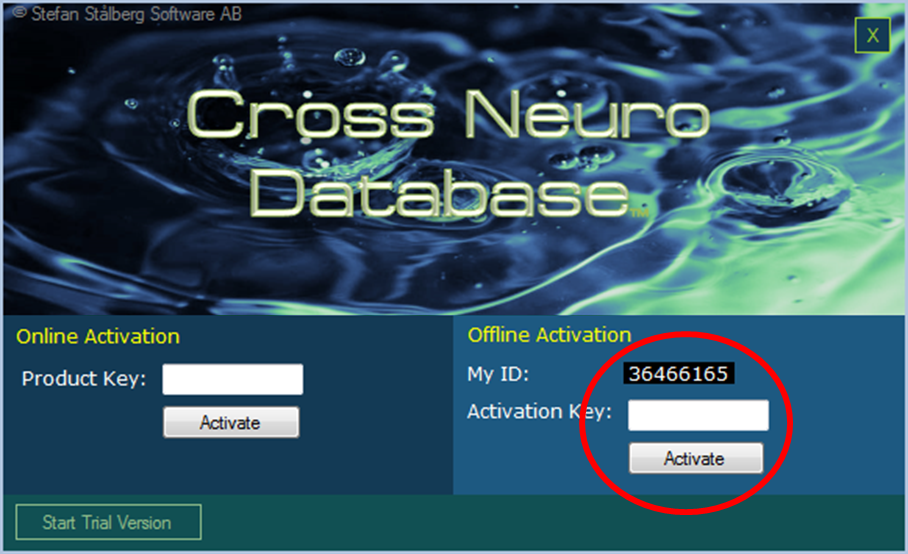
Offline Activation is used if Internet is not available from the computer where the program is installed.
- Visit Stalberg Software Activate page from another, Internet connected device.
- Insert the ProductKey and the MyID code manually and click [Get Activation Key]
- An Activation Key is shown.
- Insert the Activation Key and click [Activate] (lower right area).
- If correct codes are entered, the program is activated and continues.
A ProductKey can only be used once.
An Activation Key is unique for one computer.
In case of hard drive crash or computer replacement, please Contact Stalberg Software for instructions.
6) Prepare for Keypoint®Net Import (Keypoint.Net only)
To Import Keypoint
®Net data, the
Keypoint Net Integration Service must be enabled.
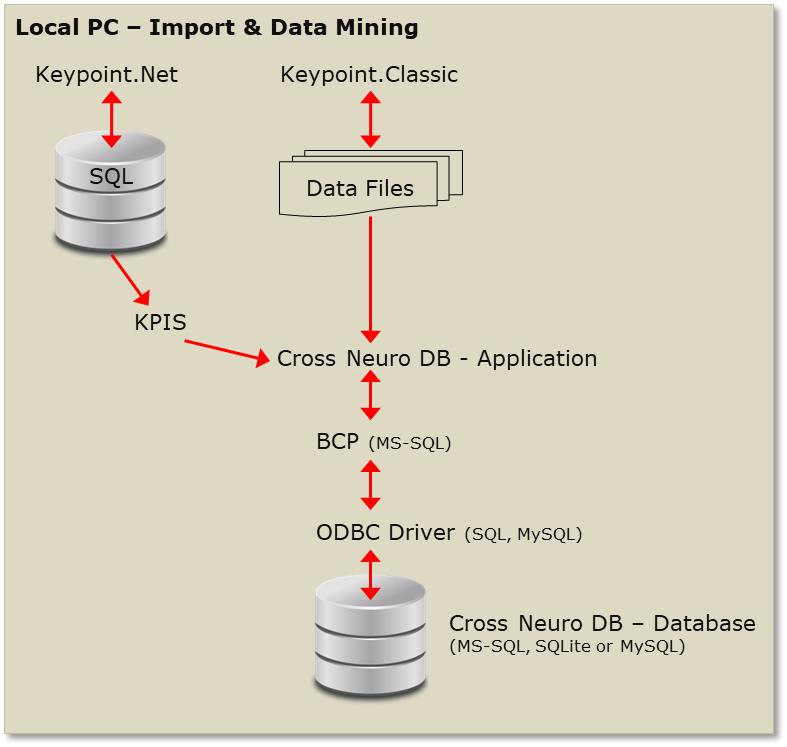
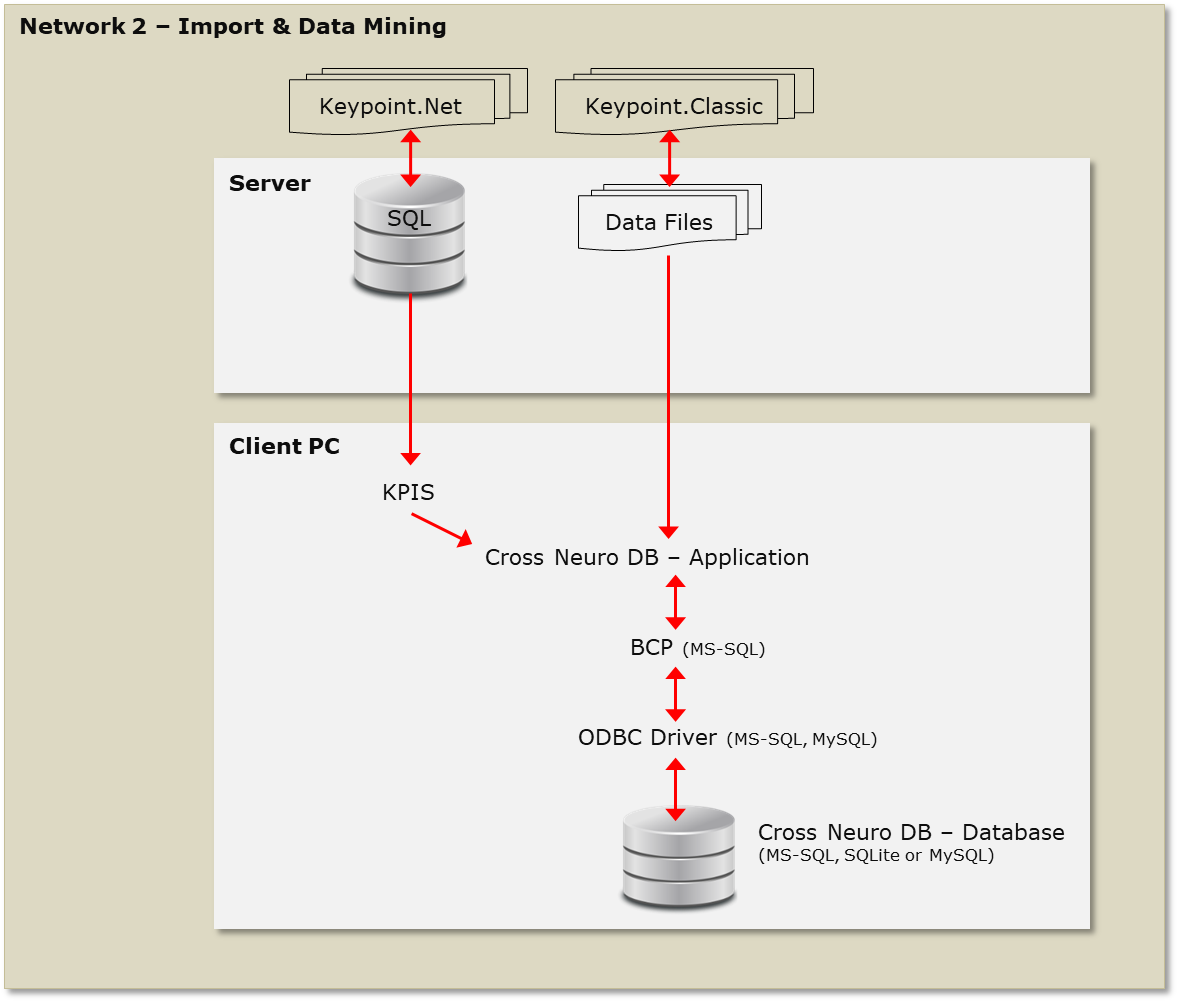
Cross Neuro Database works both on local data as well as across networks.
If MySQL or MS-SQL is used as the Cross Neuro Database:
- Corresponding Database Server Engine must be installed on the computer where the database is located.
- An ODBC driver shall be installed on each client computer running the Cross Neuro Database application.
Examples of typical configurations:

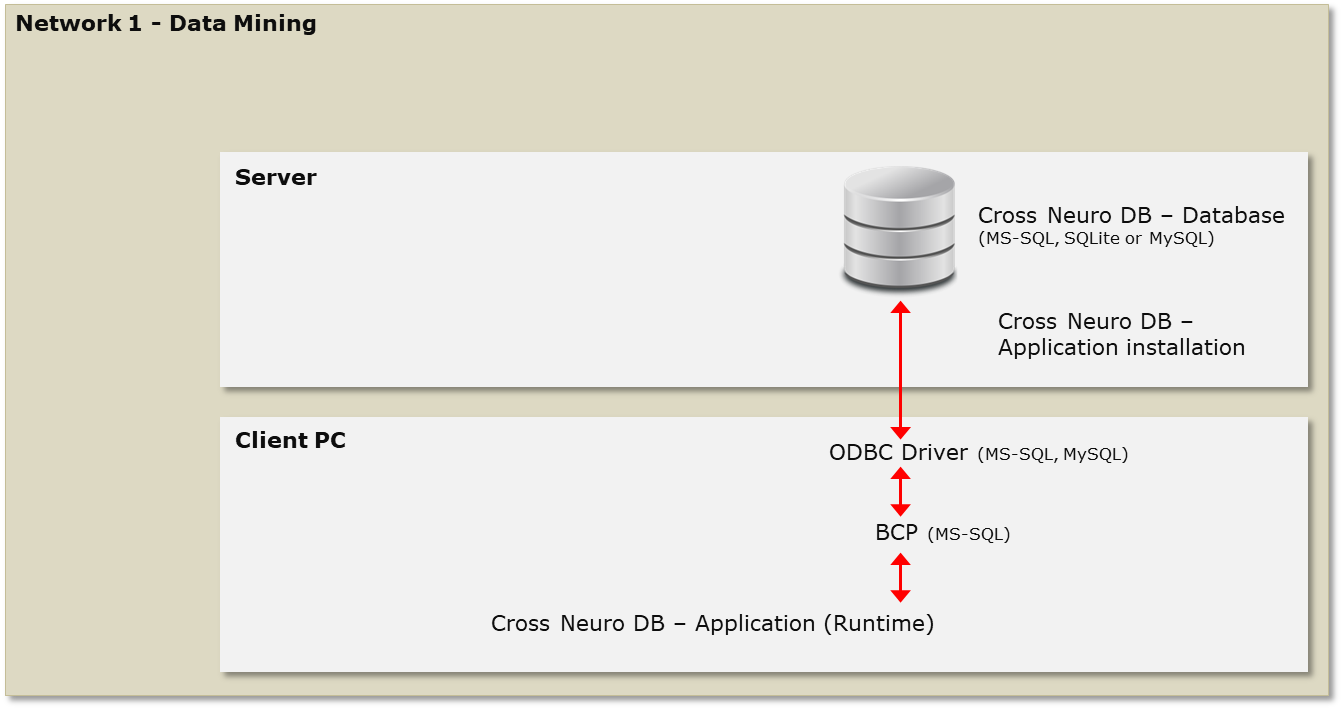
Up to 10 database servers can be configured, each with up to 10 databases.
Typically only one database server holding one database is used.
Data can be imported from one or several Keypoint.Net servers and/or one or multiple Keypoint.Classic data folders.
Example of SQLite setup:
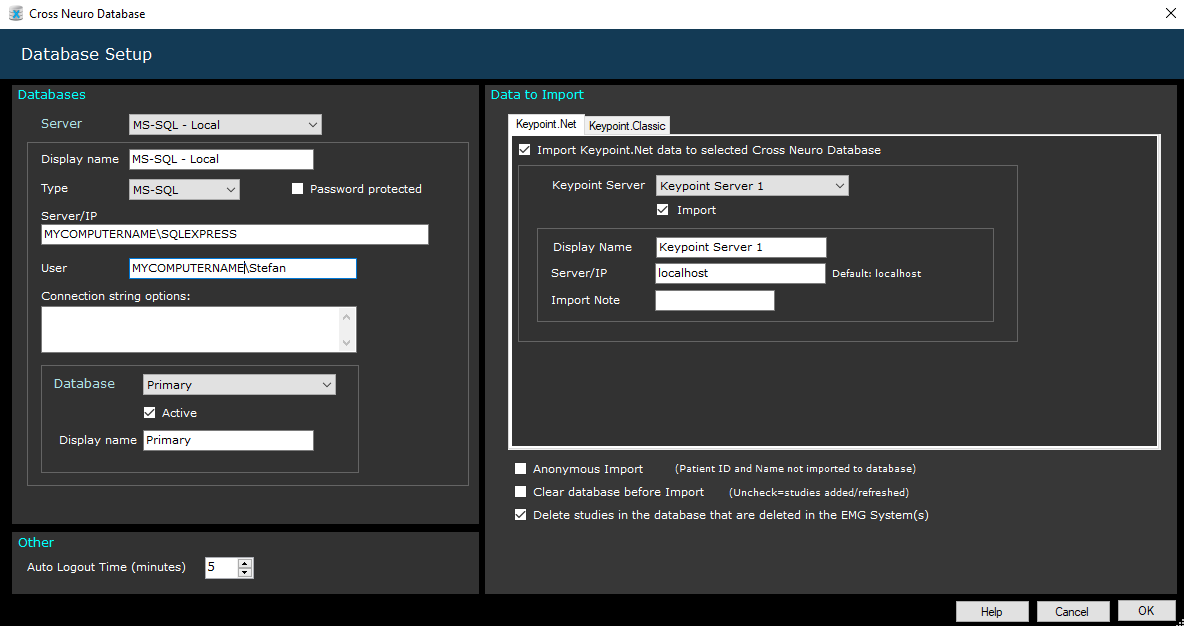
Example of MS-SQL setup:
Example of MySQL setup:
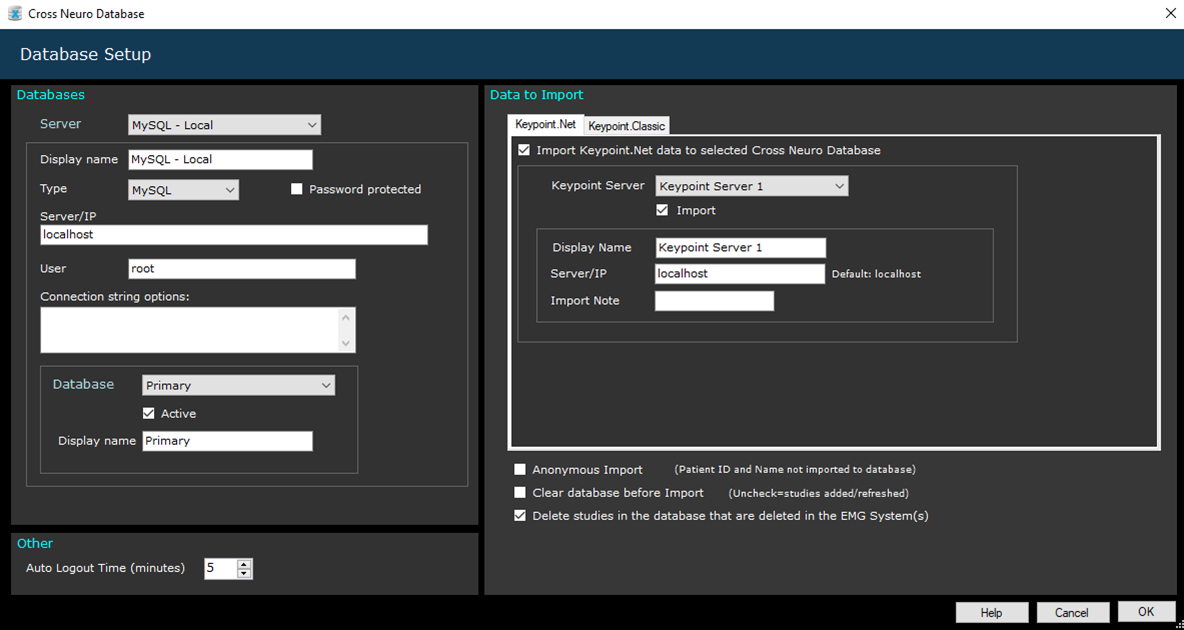
Databases:
-
Server: Select database server to configure.
-
Display Name: Database Server description (free text).
-
Type: Select database server type.
-
Password protected (MySQL and MS-SQL): check if the database server is password protected.
-
Folder (SQLite):
Specify location of the Database(s). Default is C:\Users\[user name]\Documents\Cross Neuro Database.
-
Server/IP:
MySQL: Insert 'localhost' for a local database server, otherwise enter server name or IP address.
MS-SQL: Insert name and address of the SQL server service.
-
User:
MySQL: Insert 'root'.
MS-SQL: Leave blank or insert user name according to the SQL configuration.
-
Connection string options: Additional options to connect to the database server.
MySQL, MS-SQL: If the database server is not password protected, insert 'Integrated Security=SSPI' (without quotes) to
establish a trusted connection, using Windows login security.
-
Database: Select one of the 10 databases to be created for selected Database Server.
-
Active: Check to enable the database. Active databases will be selectable from the Login page.
-
Display name: Database description (free text).
Data to Import - Keypoint.Net:
-
Import Keypoint.Net Data: Check if any Keypoint.Net data shall be imported.
-
Server: Select Keypoint.Net Server 1-10.
-
Import: Check if any Keypoint.Net data shall be imported.
-
Display name: Server name/description (free text).
-
Server/IP: Enter address to the KPIS service.
-
Import note: Optionally enter a text that will be added to each imported study.
Data to Import - Keypoint.Classic:
-
Import Keypoint.Classic Data: Check if any Keypoint.Classic data shall be imported.
-
Add, Delete, Include Subfolders: Select Keypoint data folders to be imported.
-
Import Note: Optionally enter a text that will be added to each imported study.
-
Import Data: Check if numerical data shall be imported.
-
Import Curves: Check if curves shall be imported. Note: importing curves takes a long time and also requires much larger storage capacity.
Data to Import - General:
-
Anonymous Import: Patient ID and Name are not imported. Note that 'Patient Review' can not be used with an Anonymous database.
-
Clear Database before Import: All data in the database will be cleared before a new Import starts. If not selected, the database will be updated with new and updated studies.
-
Delete studies in the database that are deleted in the EMG System: Check to have a full synchronization between the Cross Neuro Database and the EMG systems database.
Prepare for Keypoint®Net Import
To Import Keypoint
®Net data a few steps are required:
(1) The 'Keypoint.Net Integration Service' (KPIS) and 'Keypoint.Net Service' must be installed and running on the computer where the Cross Neuro Database application is running.
To check that:
- Right click on the Win-key (lower left flag) icon
- Select Task Manager - Services
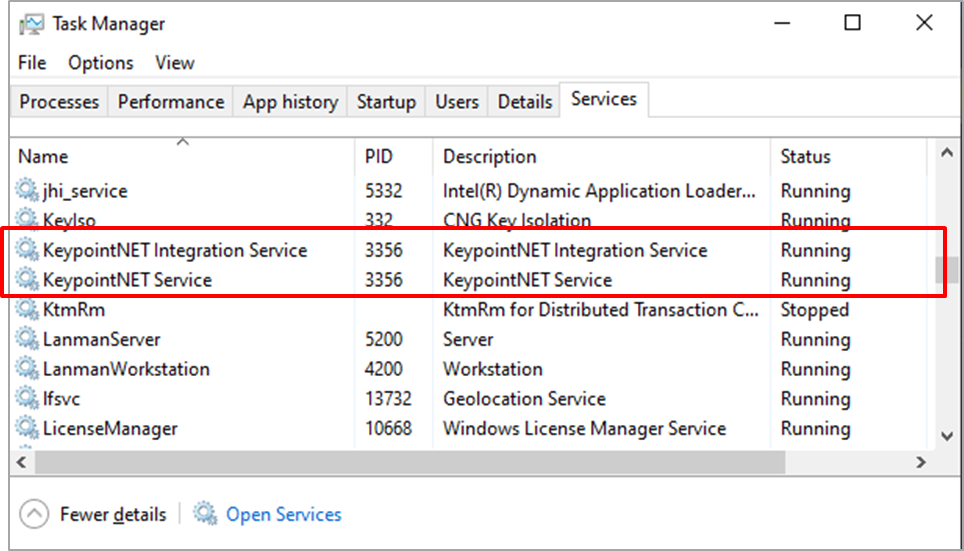
If any of these services are not running, follow these steps:
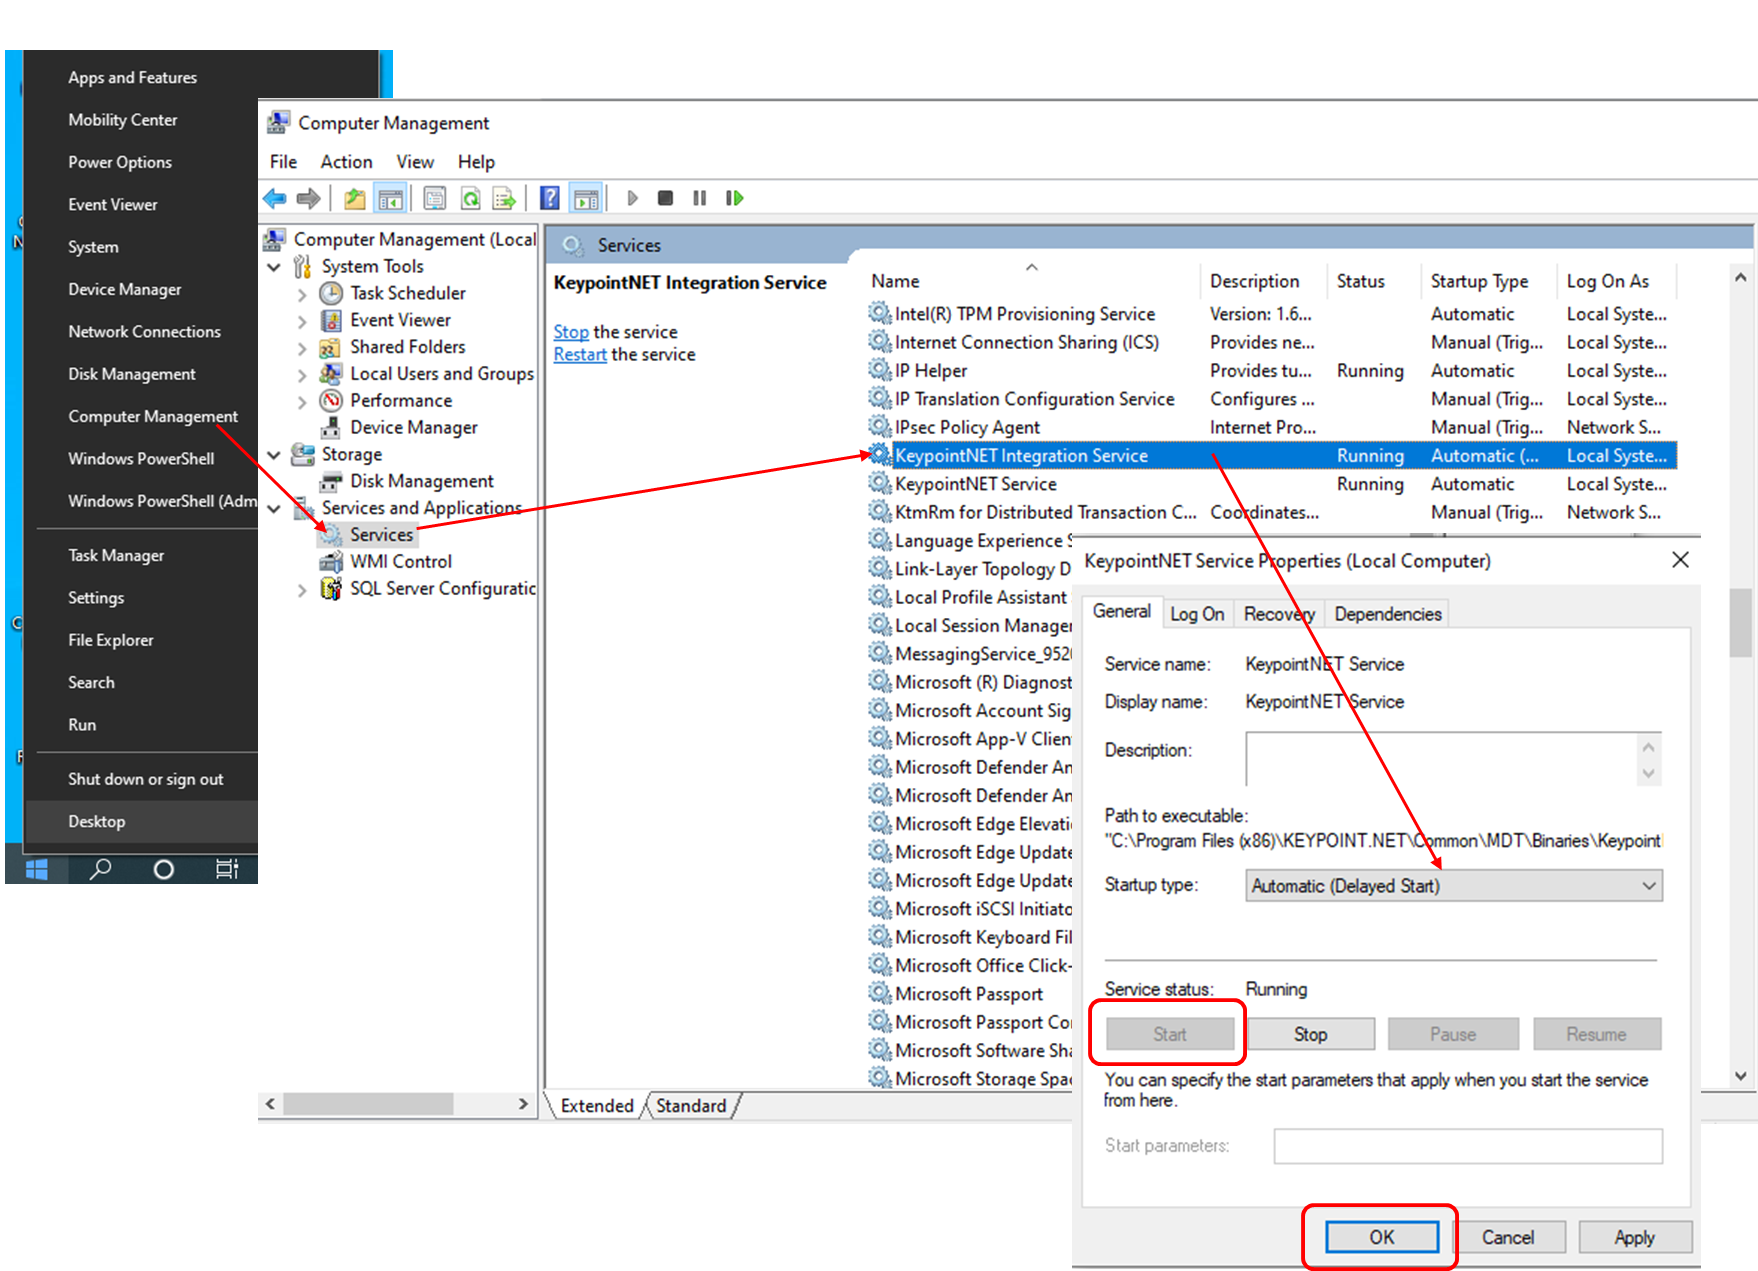
- Right click on the Win-key (lower left flag) icon
- Select Computer Management
- Expand 'Services and Applications'
- Select Services
- Right Click on 'KeypointNET Integration Service' and select Properties
- Set Startup Type to 'Automatic (Delayed)'
- Click Start, Apply, OK
- Repeat the procedure for the 'KeypointNET service' if necessary.
- Close all windows
(2) The Keypoint
®Net report template 'CrossNeuroDatabase' must be installed:
- Start Keypoint
®Net
- Enter 'Options' - 'System' - 'Reports'
- Right click in the upper left report template area and select 'Import'
- Select the file 'C:\Users\< user >\My Documents\CrossNeuroDatabase\System\crossceurodatabase.wrs'
- Exit Keypoint
®Net
(3) Change check-in mode. NOTE: Only necessary if Keypoint Datacenter (network server) is used.
- Start the 'Keypoint Admin Tool' program as an Administrator (right click on the desktop icon and selecxt 'Run as administrator').
- Select Networking
- Change Network check in mode to: 'Use Keypoint.Net Service' (2.40) or 'Use KPIS' (2.32).
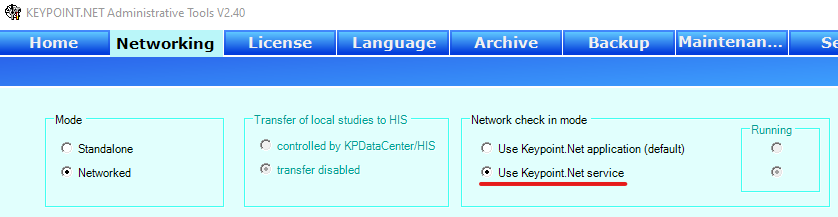
- Exit
- Restart the computer.
CrossNeuroDatabase can now be started and perform an Import of Keypoint
®Net data.
If multiple databases are Active (see
Database Setup), select the database to be used.
The last used database will be selected by default.
Local MySQL database: enter the
"Root password" as inserted during MySQL installation.
Remote MySQL database: enter the
"User password" as inserted during MySQL installation.
Local or remote MS-SQL database: enter the password set during MS-SQL database configuration. This field is not seen if a trusted connection is established, i.e. no password is used.
SQLite database: password protection is not used.
Insert password, if required, and click
[Login] to continue.
Click
[Setup] to access the Database Setup.

After successful login, the main menu is seen:
To logout, switch database or edit settings, click
[Logout] or exit and restart the Cross Neuro Database program.
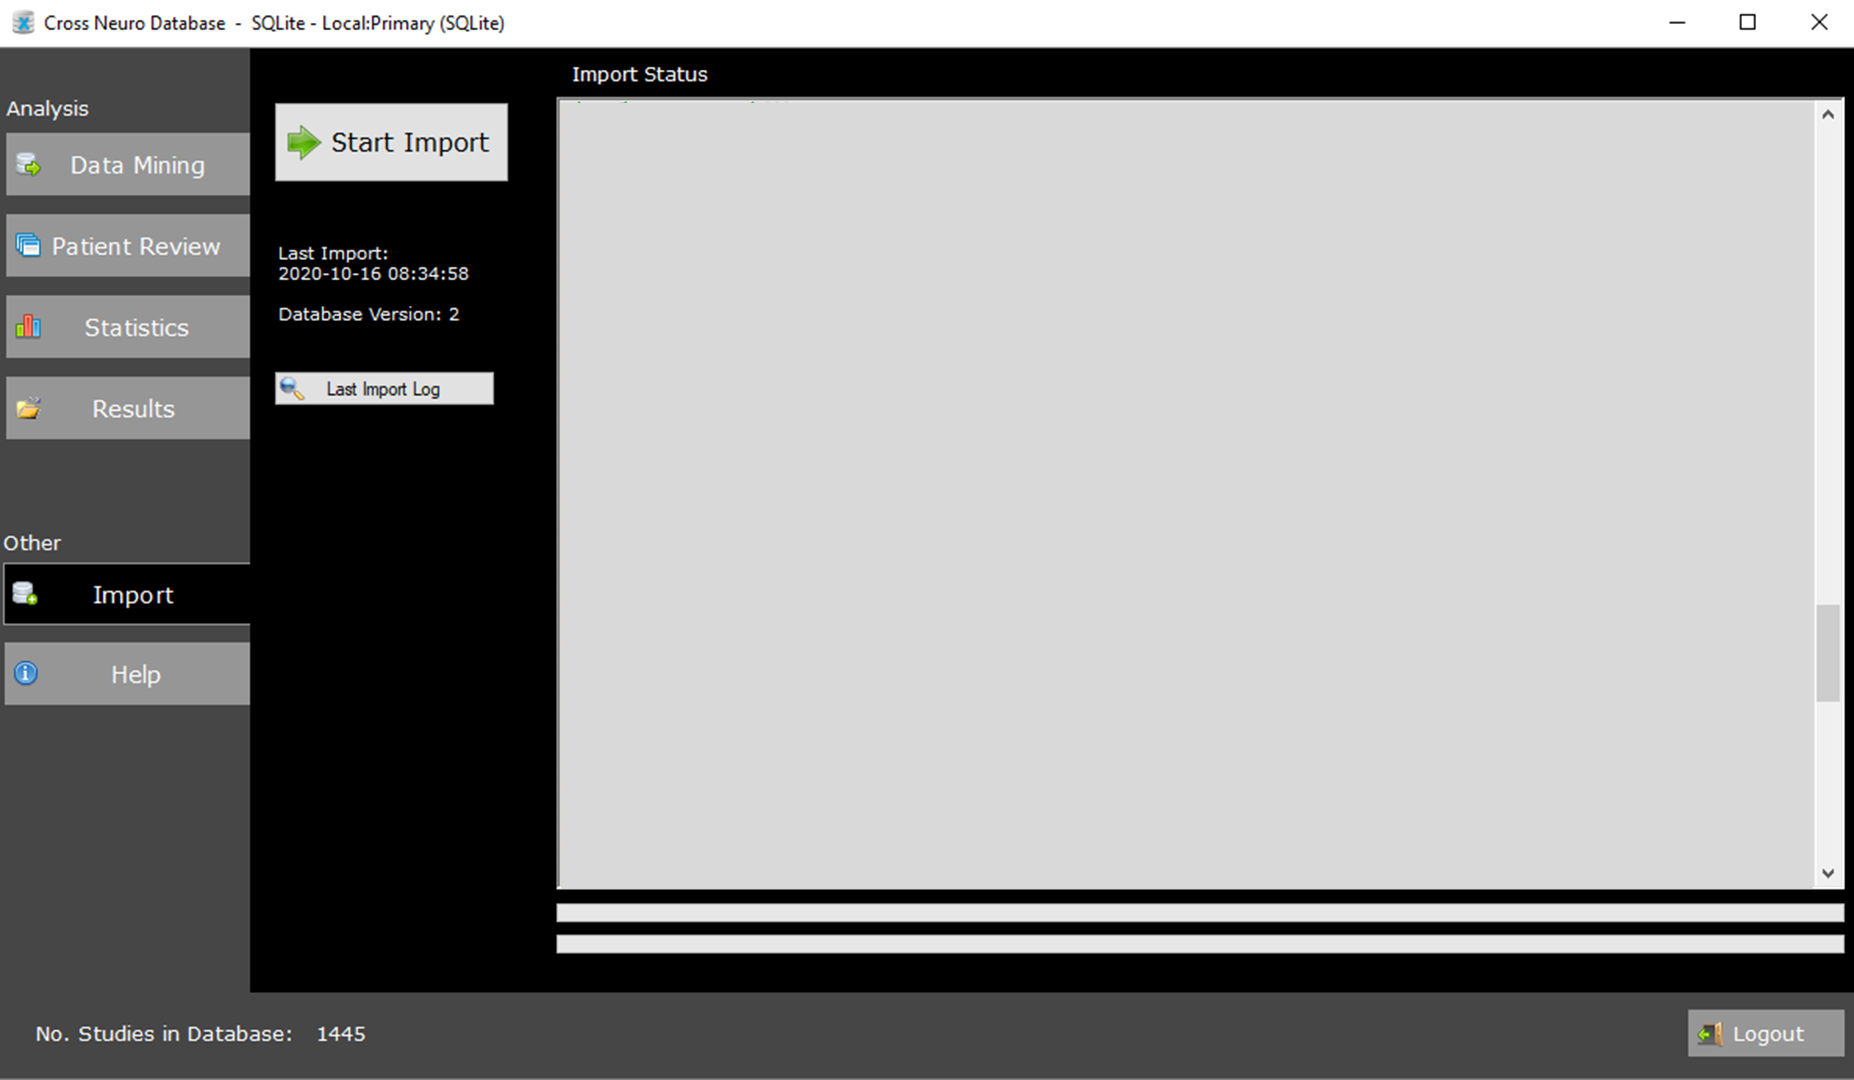
The Import function reads data from the EMG System(s) and places the results in currently selected database.
Data and curves (if selected) are imported into the database tables, one per test type.
Click
[Import] followed by
[Start Import] to import data from all data sources defined in Setup.
A log is kept for the last Import process. Click
[Last Import Log] to view the log.
During Import, temporary files are created in C:\users\<user>\Cross Neuro database\Temp.
The Temp folder must have at least 4GB free space if both Data and Curves are Imported, and 2GB if only data is imported.
Keypoint
®Classic: Verify in the config.xml file that correct Code Page is specified. Find and edit the item 'importCodePage'.
Import running:
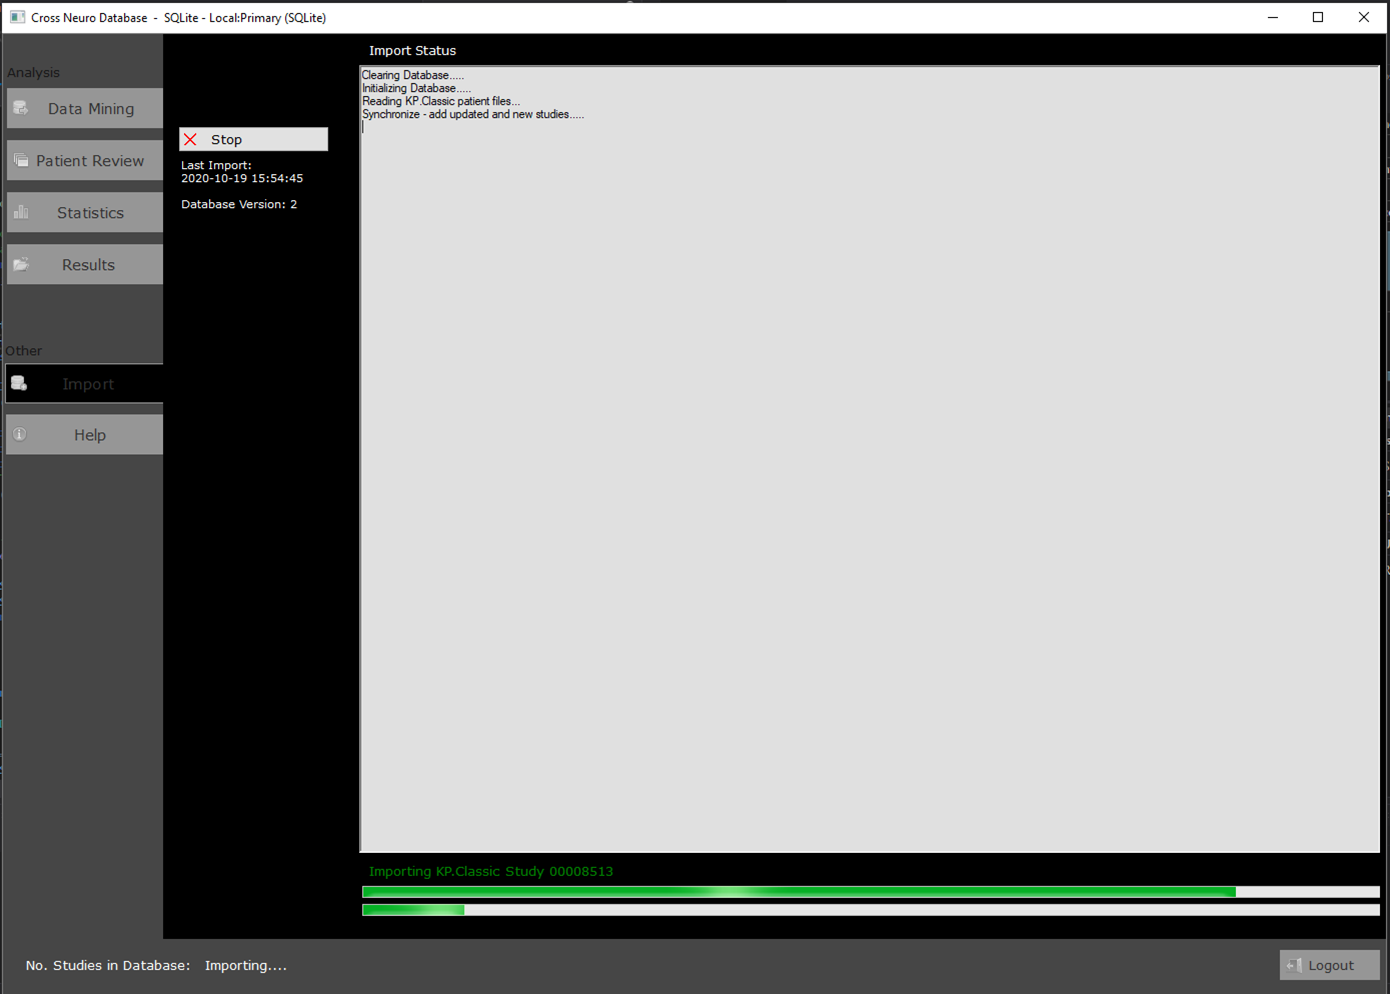
Import usually takes a long time (hours), depending on number of studies and computer performance.
Excluding curves (see Setup), significantly reduces the total import time.
Uncheck 'Clear database before Import' in Setup to only Import studies added since last Import.
All data are now saved inside the database and ready to be processed by Data Mining features.
Do not delete the original EMG System data!
It is likely that the database needs to be refreshed by future versions and the data files are required at each Import procedure.
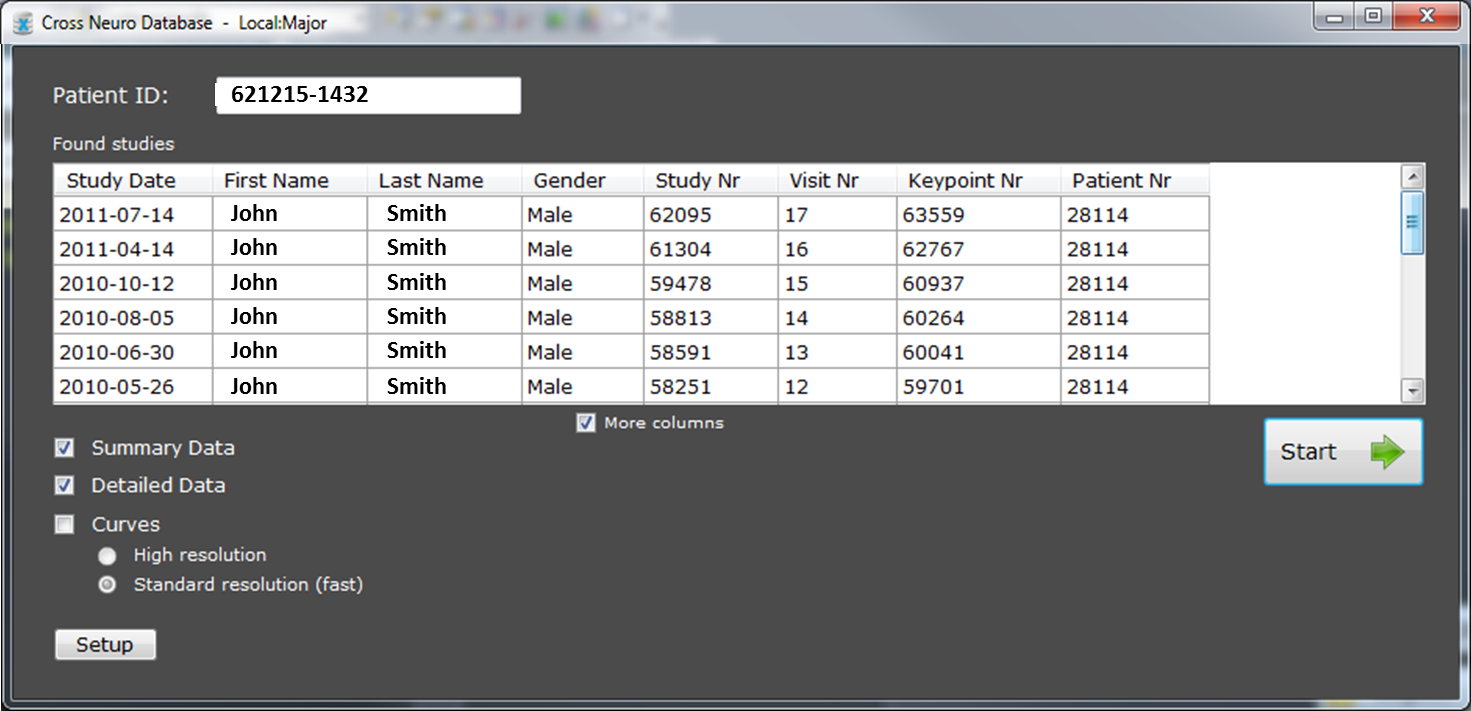
- Select Patient Review from the main menu.
- Insert patient ID.
- Note: Patient Review doesn't work with an Anonymous database since Patient ID is not available.
- All visits found for the patient are listed.
- Select result options.
-
Summary Data = An Excel sheet with selected parameters from selected data tables for all visits.
Tables and parameters are selected using [Setup].
-
Detailed Data = One Excel sheet per data table. All parameters from all visits.
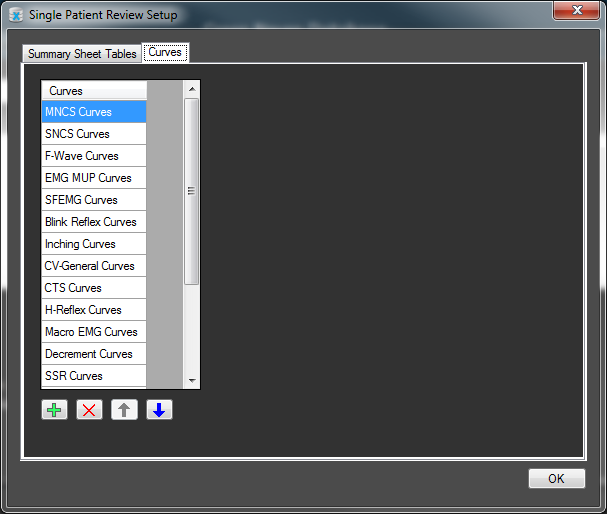
-
Curves = A Powerpoint presentation with selected curves.
Included curve types are selected using [Setup].
Select resolution of curves.
- High resolution: all samples.
- Standard resolution: plots every Nth sample depending on curve type.
- Select Setup to change content of output.
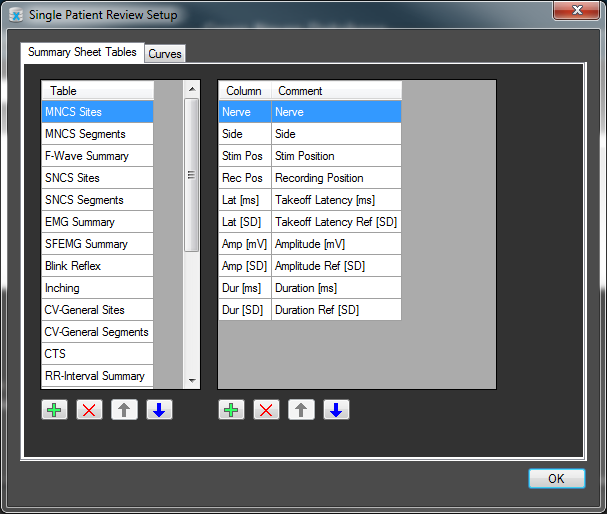
- Click on a Data table to view selected parameters.
- Use the control buttons to add, deselect and position selected tables and parameters.
- The layout is saved when pressing OK.
- Click Start to produce results.
- The displayed results are overwritten next time you do a Patient Review.
Use 'Save As' in Excel and PowerPoint to save files permanently.
Summary Data presented in an Excel sheet:
 Detailed Data
 presented in one Excel sheet per type:
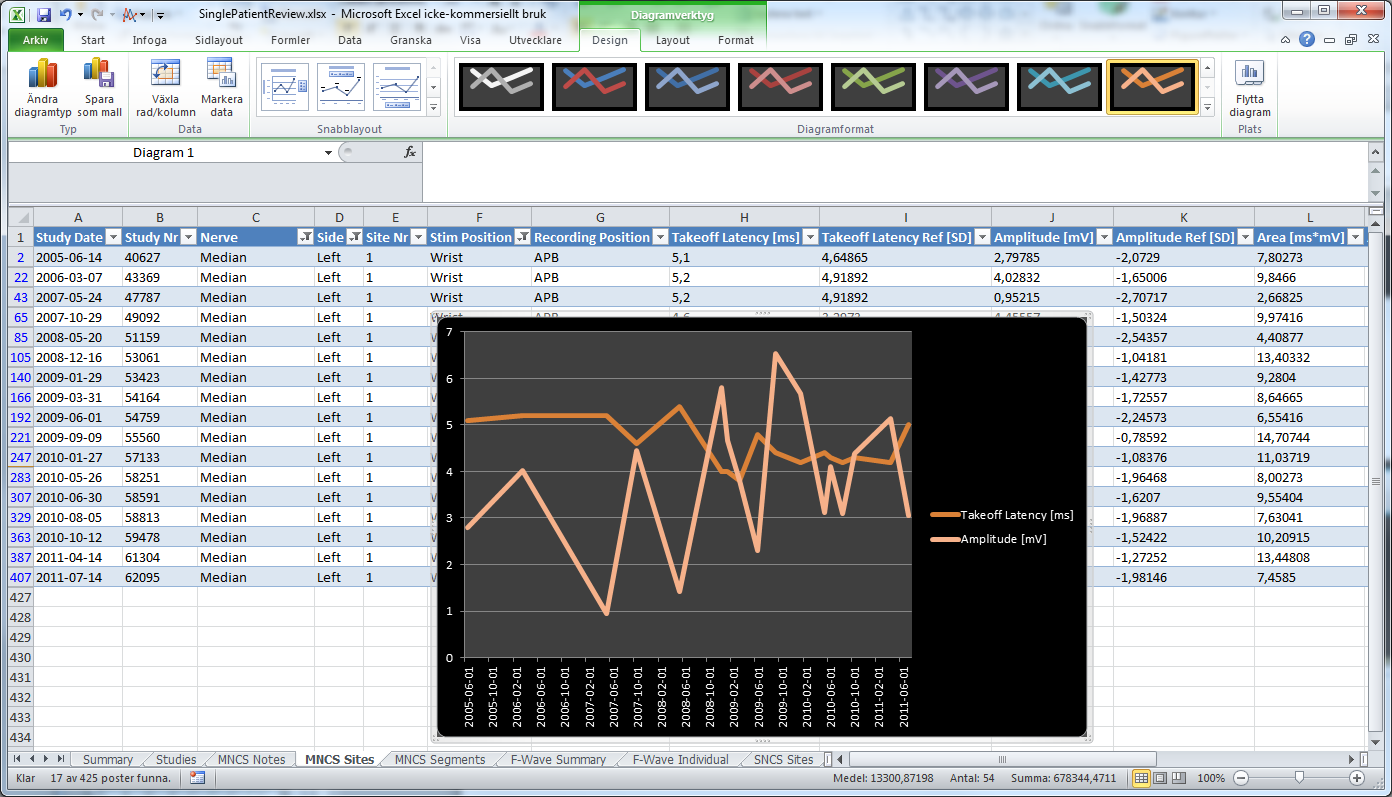
This table layout allows follow up on one or multiple parameters for a selected patient.
This is how to do it:
- Select datatable using the bottom tabs.
- Filter the nerve, side etc. to be included in the follow up using the arrow in the field header.
- Select the entire Study Date column (click on the header letter).
- Select parameter(s) to monitor by holding the keyboard Ctrl-button down while clicking on the parameters column header letter.
- Select Insert-Line chart
An example:
 Curves
 in a Powerpoint presentation:
(Note: curves not available for Keypoint.Net studies)
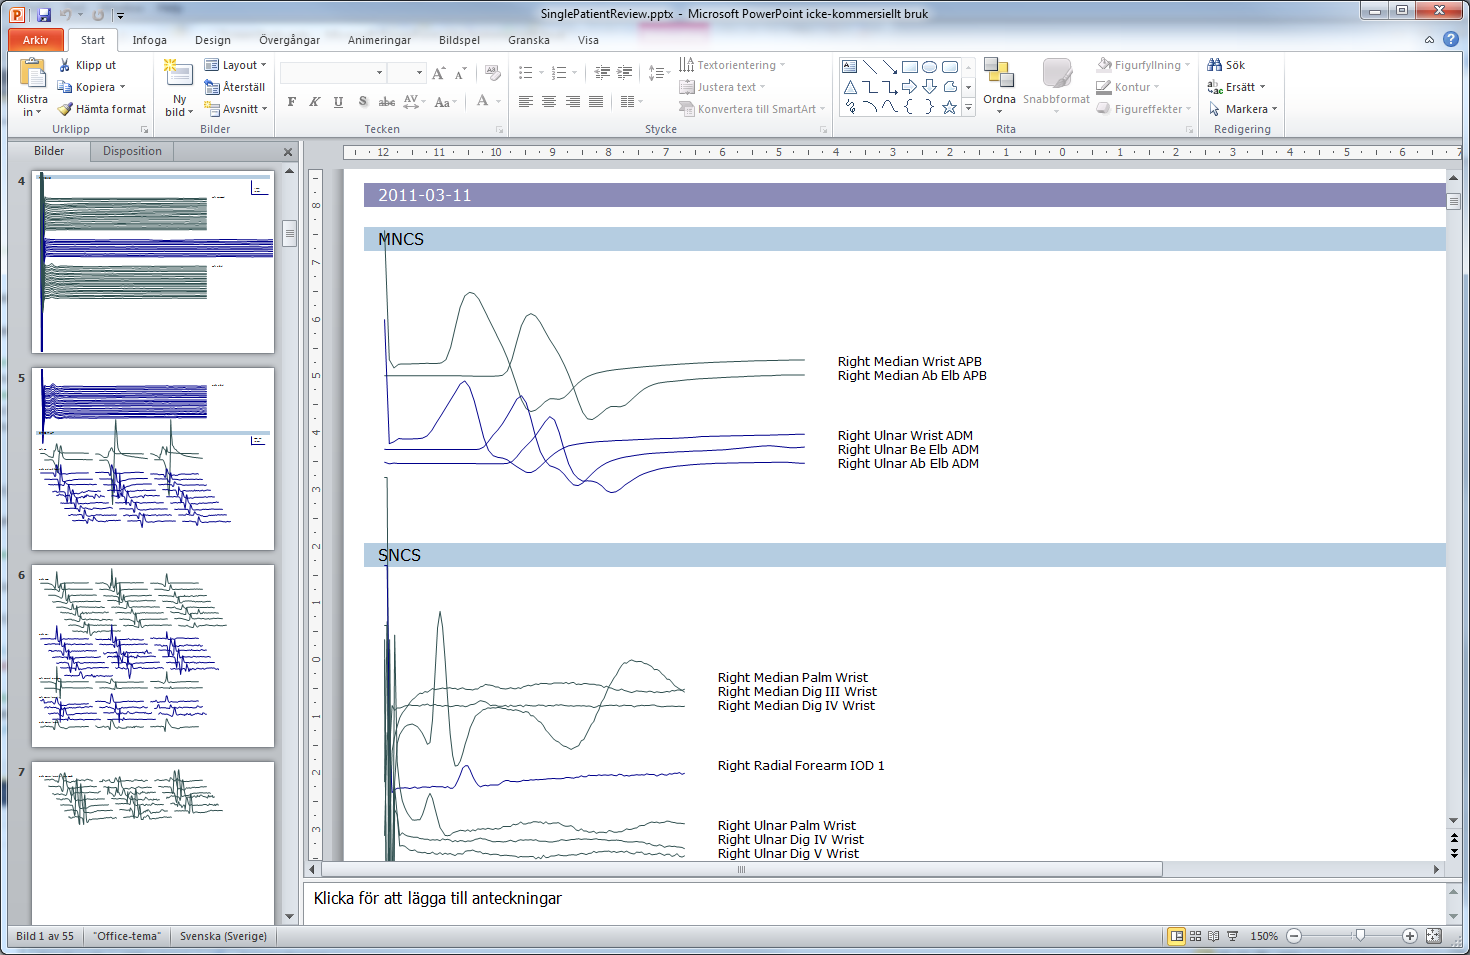
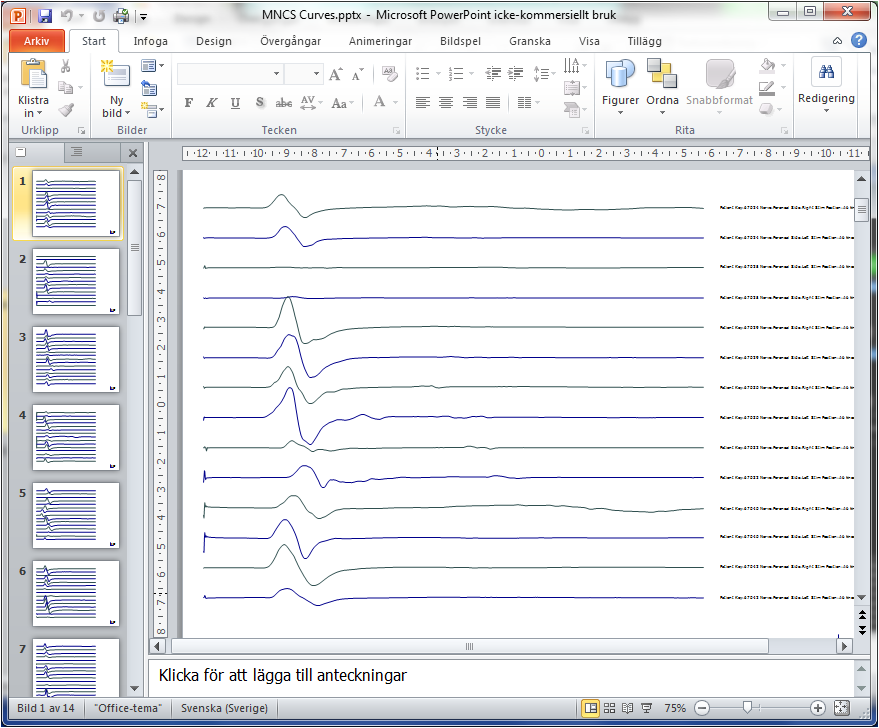
Curves of same type are drawn with same X and Y scales to allow graphical comparison (eg. superimpose).
Use Powerpoints rescale features to resize individual curves.
Select
Data Mining in the Analysis window from the main menu.
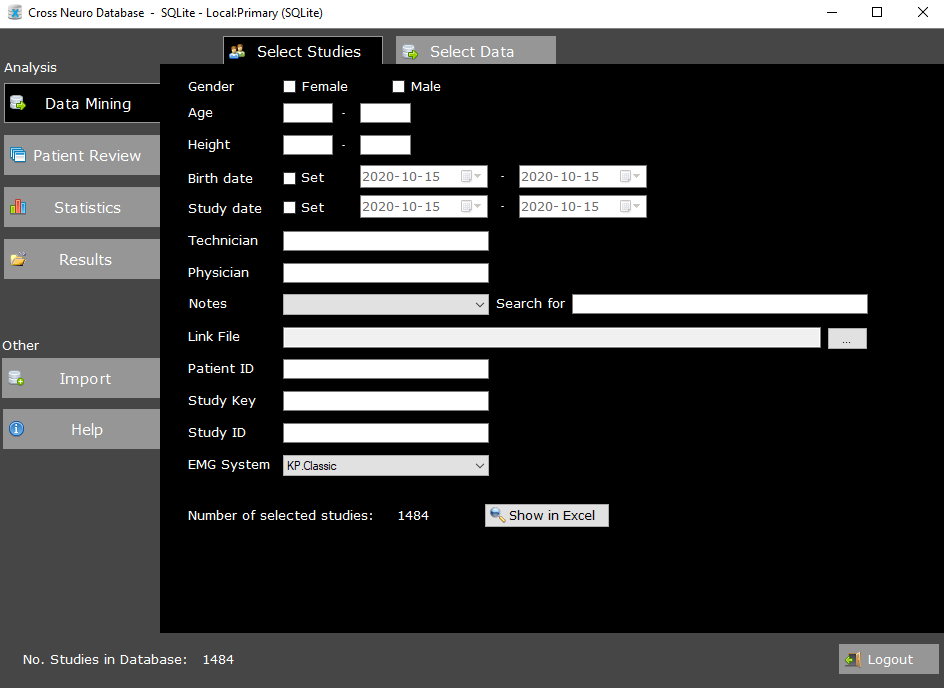
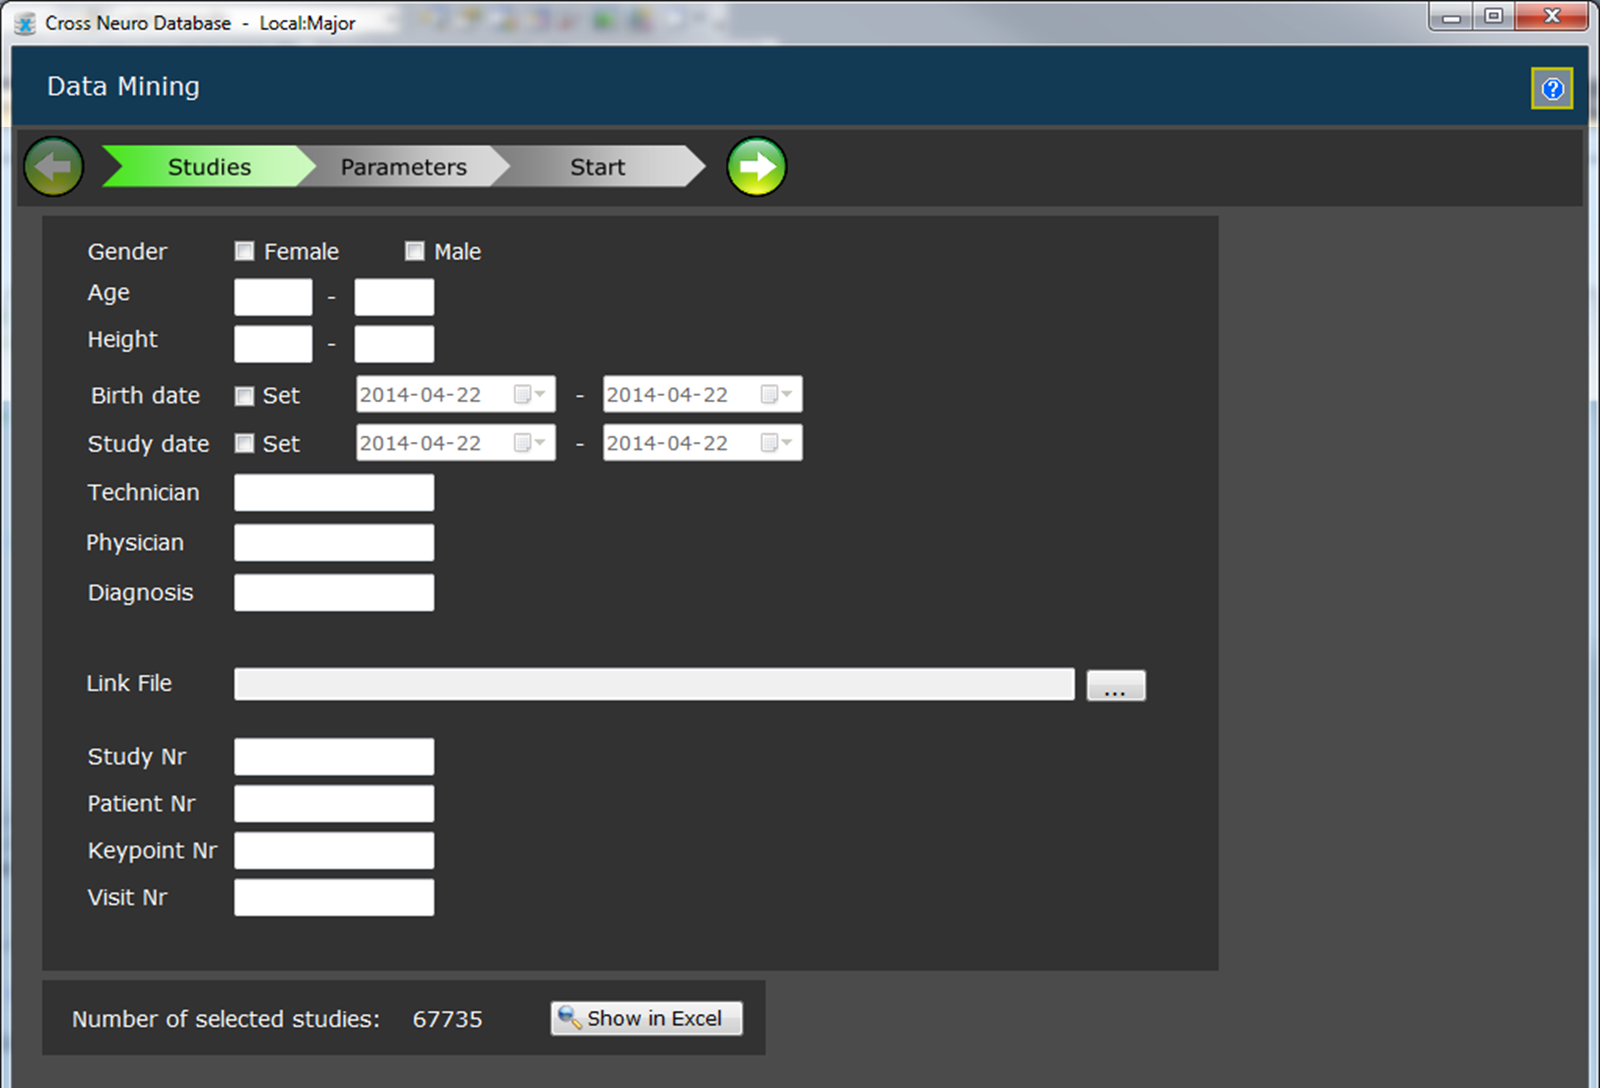
(1) Select Studies
As the first step of the Data Mining process, insert filtering details for the studies to be extracted.
Number of studies found in the database, matching the inserted filters are shown on the last line.
Wildcards (*=any text and ?=any character) may be used for text fields (Technician, Physician, Diagnosis). E.g. Diagnosis = 'N35*' will select both N351 and N35678. Diagnosis = 'P3?X' selects all 'P31X' and 'P32X'.
 Link File
 selects the studies listed in a text-file.
The file may consist of either Study ID's, Patient ID's or Study Keys.
Inserting Patient ID will select all studies for the specified patient.
Create a text file (e.g. using Notepad) and enter one number per row.
Save the Link files in \MyDocuments\Cross Neuro Database\LinkFiles.
Click on […] and select the text file.
Select contents of the file. A warning will be given if any errors are found. Duplicate numbers will only be included once.

The study identification fields are used as follows:
Study ID: Study identification number. Manually inserted in Keypoint
®Net. Sequential Keypoint number (without zeros) used in Keypoint
®Classic.
Patient ID: Patient identification. Same for all studies for each patient.
Study Key: Unique, internal GUID value created for each study by Cross Neuro Database. This value may be updated by the Import function.
Patients matching current filter can be reviewed in Excel.
Click the green right arrow at the top (Next) when the patient group is selected.
(2) Select Data

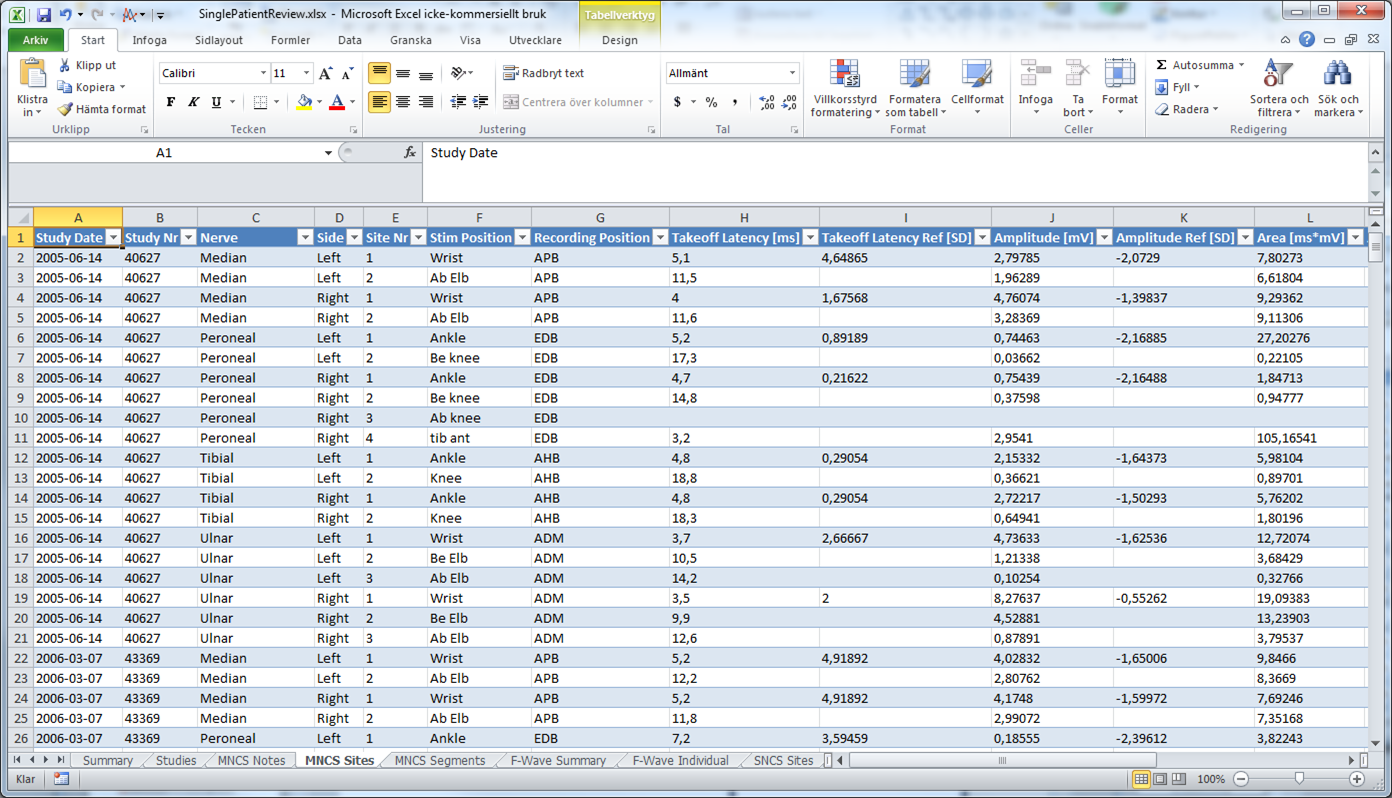
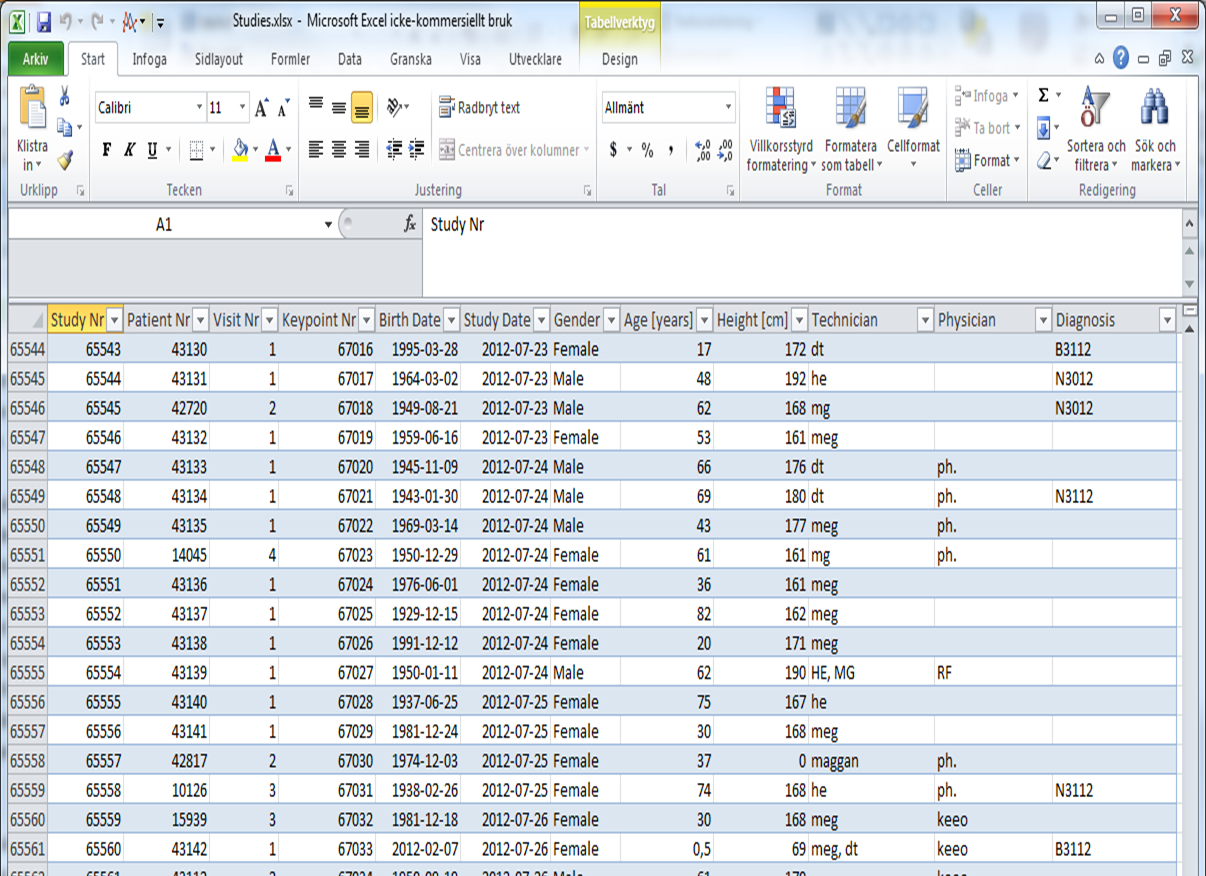
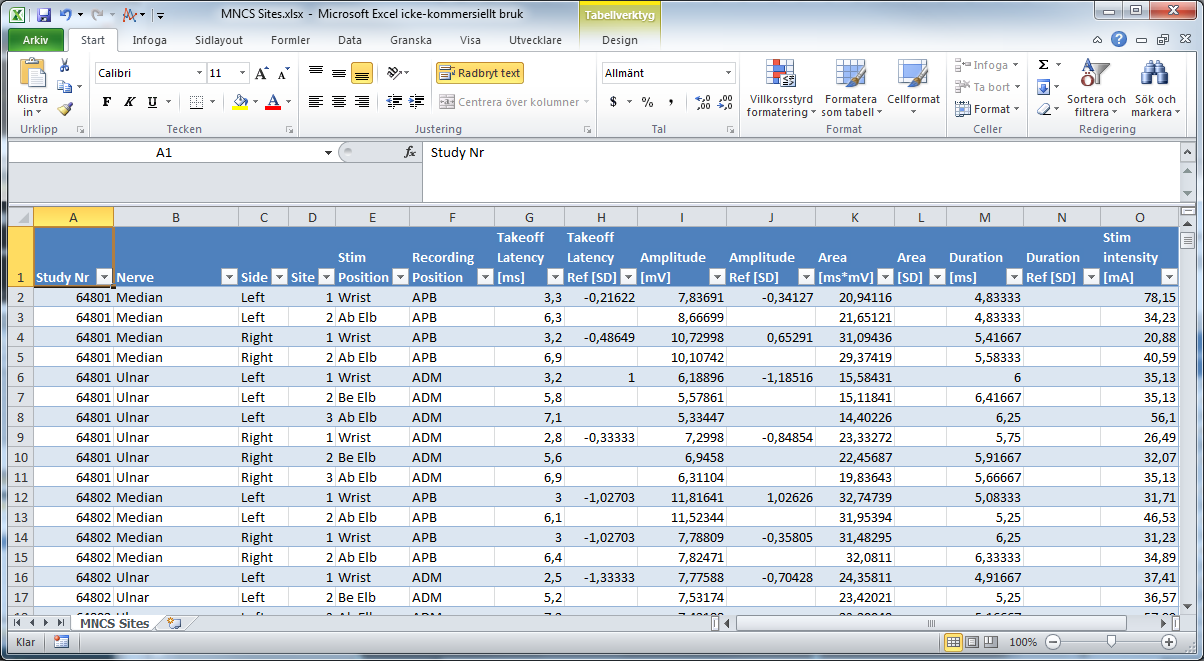
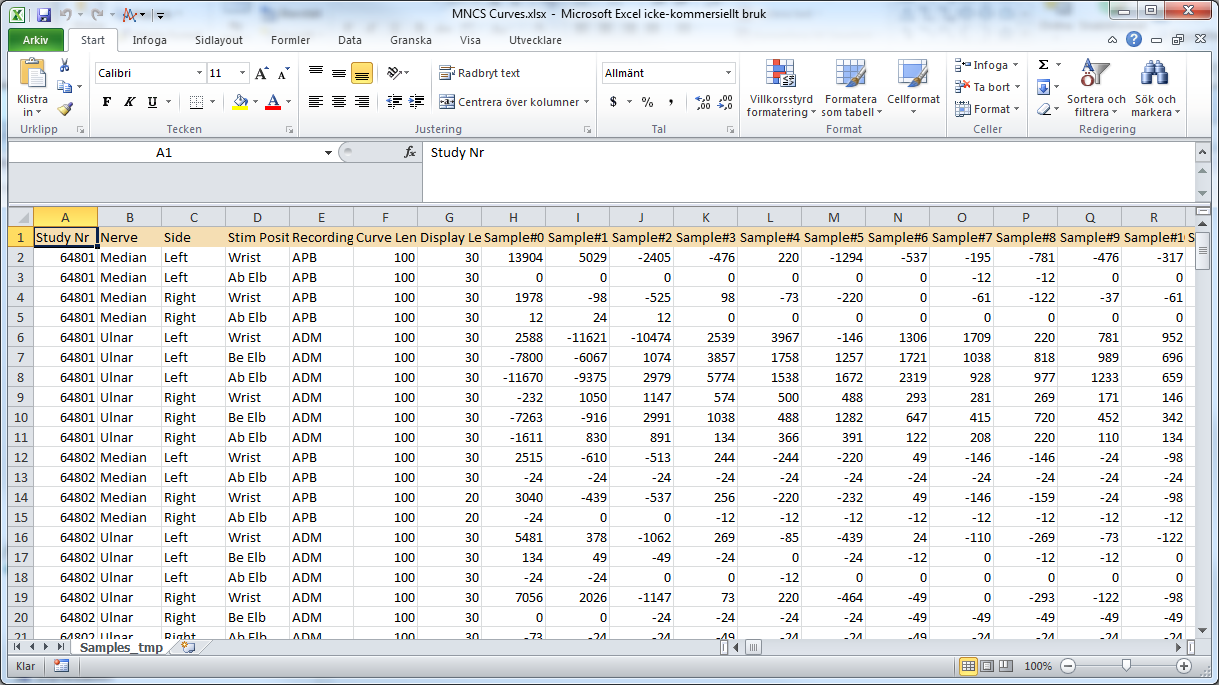
Each test type is stored in a ‘table’ inside the database. One parameter per column and one recording per row.
Take a look at the MNCS Sites table as one example:
Curves are stored in tables as well, with one curve per row and each sample value per column.
Like this:

Similar tables are created during Import in the database for each test type. Some tests are divided in to several tables, e.g. MNCS Sites, MNCS Segments. There are in total 32 data tables, 21 curve tables and one Study table.
The field ‘Study Nr’ is available in all tables. It is unique for each study and used to connect all tables and link information belonging to the same study.
Extracting data and curves using the Data Mining features are divided into three output structures:
- Data Parameters
- Data Parameters - Merged
- Curves (Keypoint®Classic only)
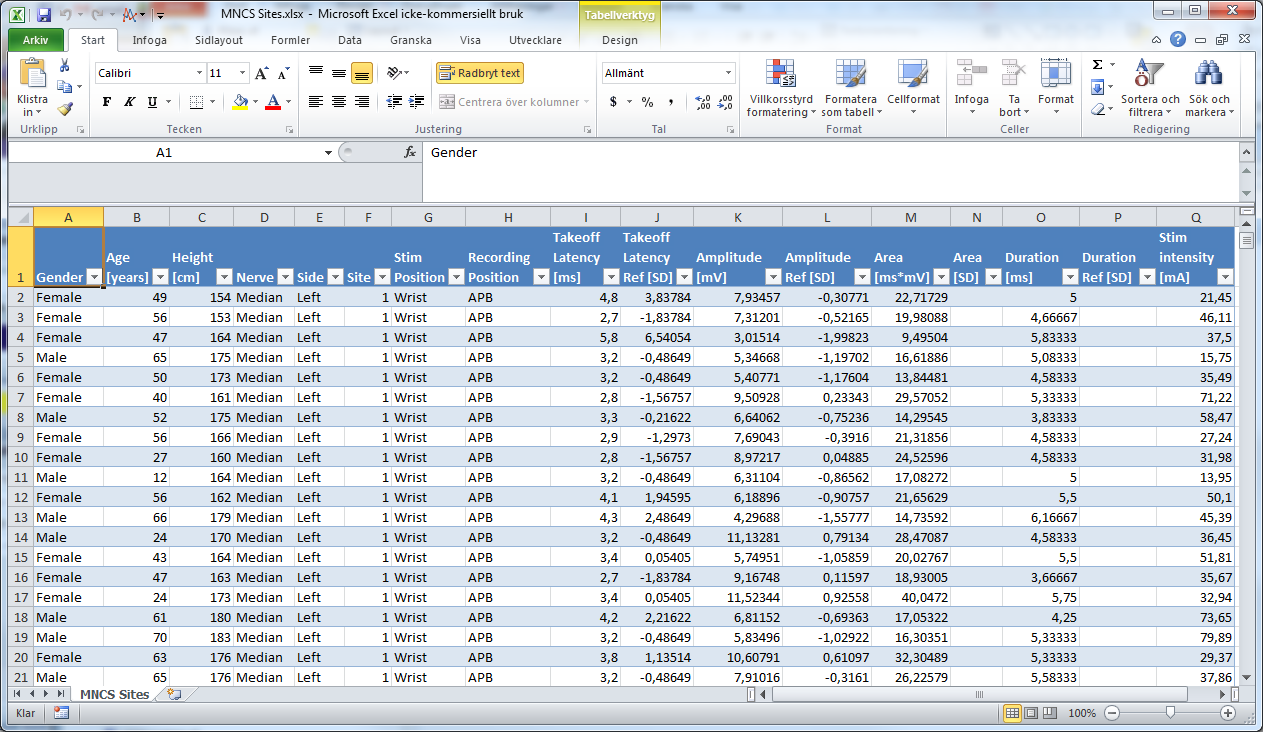
Select Data Parameters
Output will have same format as the database table, but with possibility to select/exclude parameter columns. This type shall be used to analyse parameter(s) for one test type,
e.g. MNCS Median Distal Latency. Anatomies (nerves/sites, muscles) will be placed under each other.
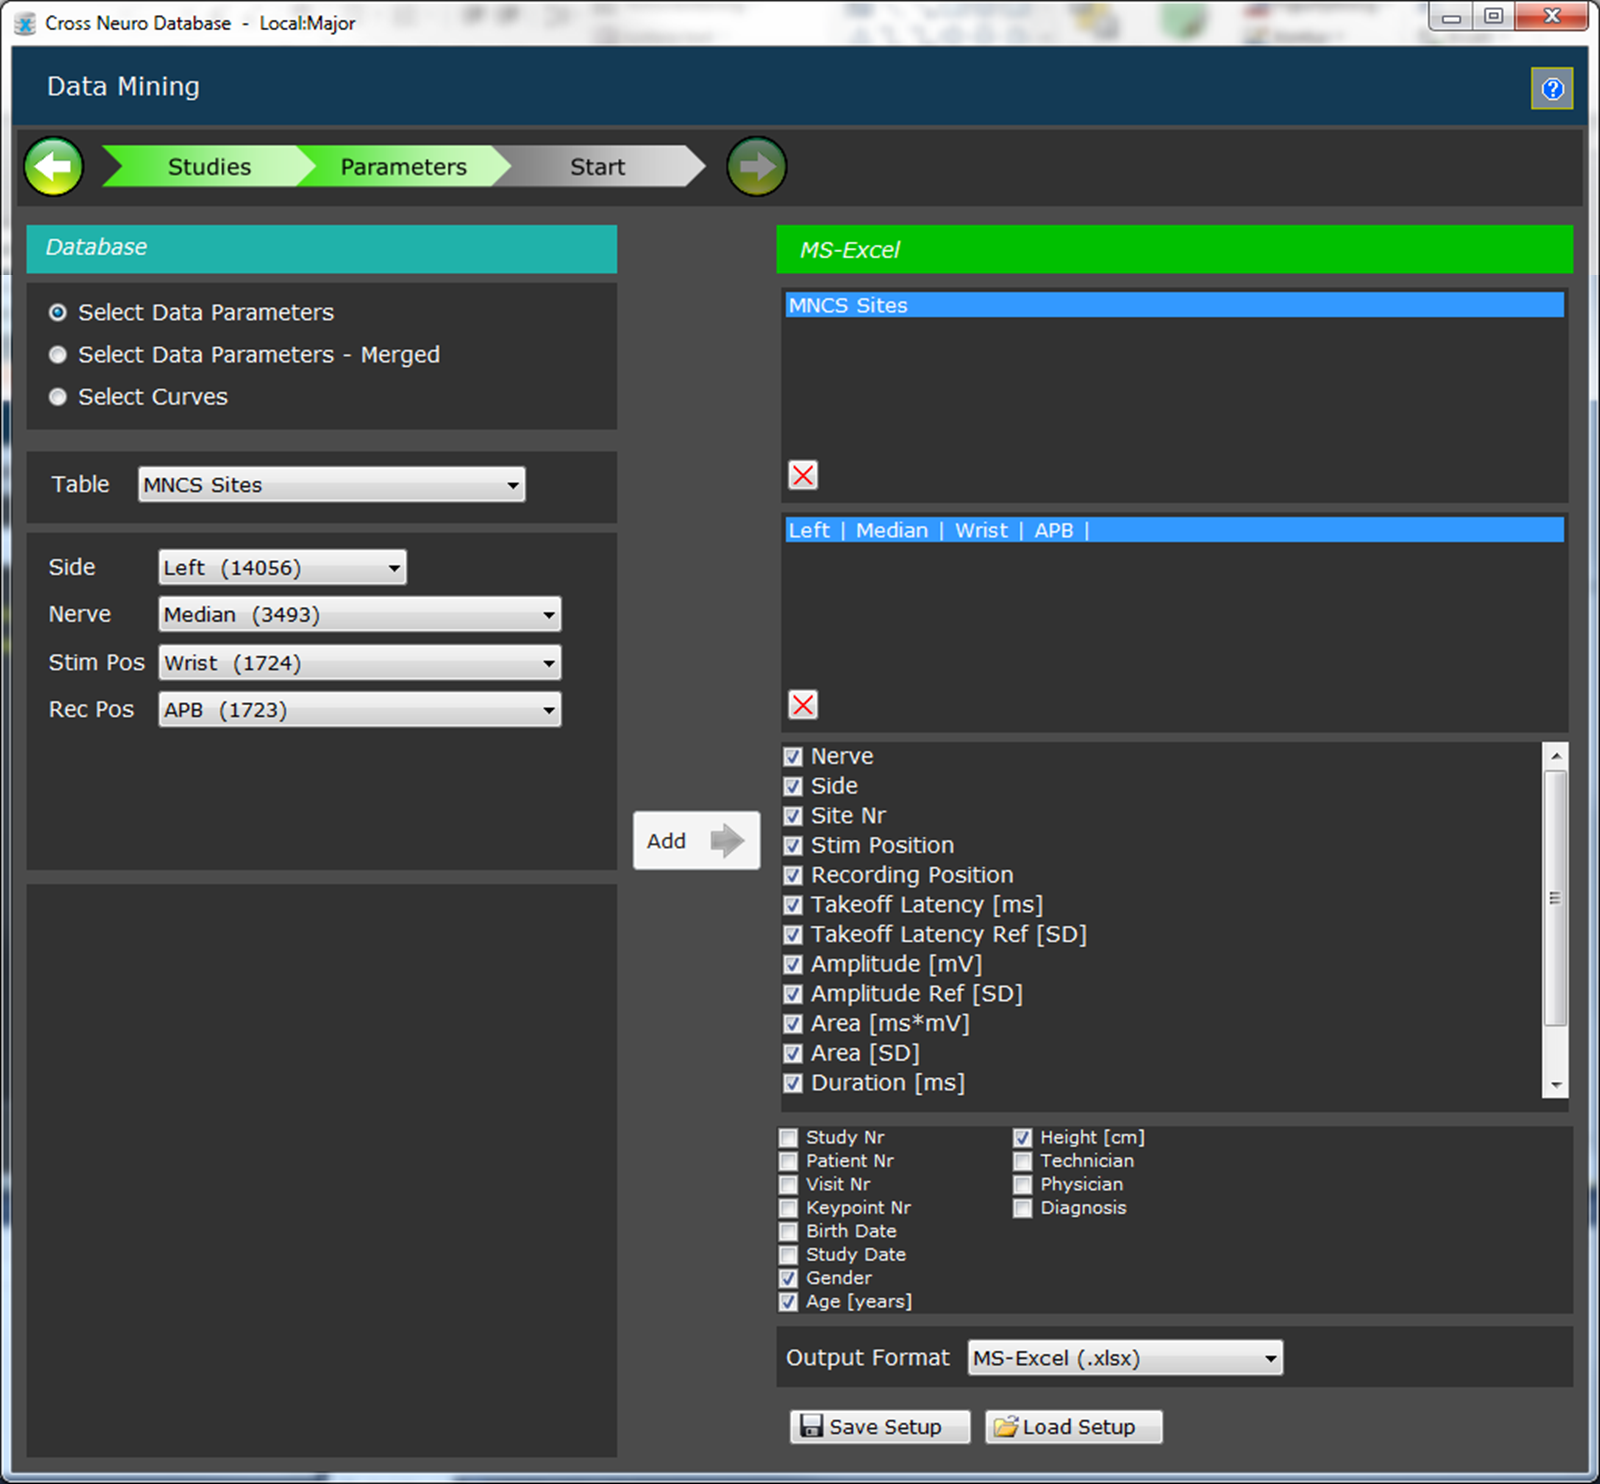
Left column:
- Select Table type
- Specify the anatomy filter settings.
Leaving a field empty or *ALL* means no filter.
All table rows matching the filter will be extracted.
- Click [Add] to save the filter.
Right Column:
- Topmost section shows all added data table types.
- The section below shows all anatomy filters for the selected table type.
- Select parameters for each table type to be included in the output.
- Select additional patient data fields to be added to the output.
- To save time, use [Save Setup] to save current filter settings and [Load Setup] to load previously saved settings.
Click the green right arrow to Start Extraction (see below)
An example of a Data Parameters table:
Select Data Parameters – Merged
Output will be one merged table, with columns extracted from one or multiple database tables. This allows comparison of for example MNCS Site with an EMG parameters recorded on the same patient.
This type shall also be used when comparing parameters from the same table, but different anatomies.
E.g. MNCS Left Motor Median Wrist-APB Latency --- MNCS Left Motor Ulnar Above Elbow – ADM Latency.
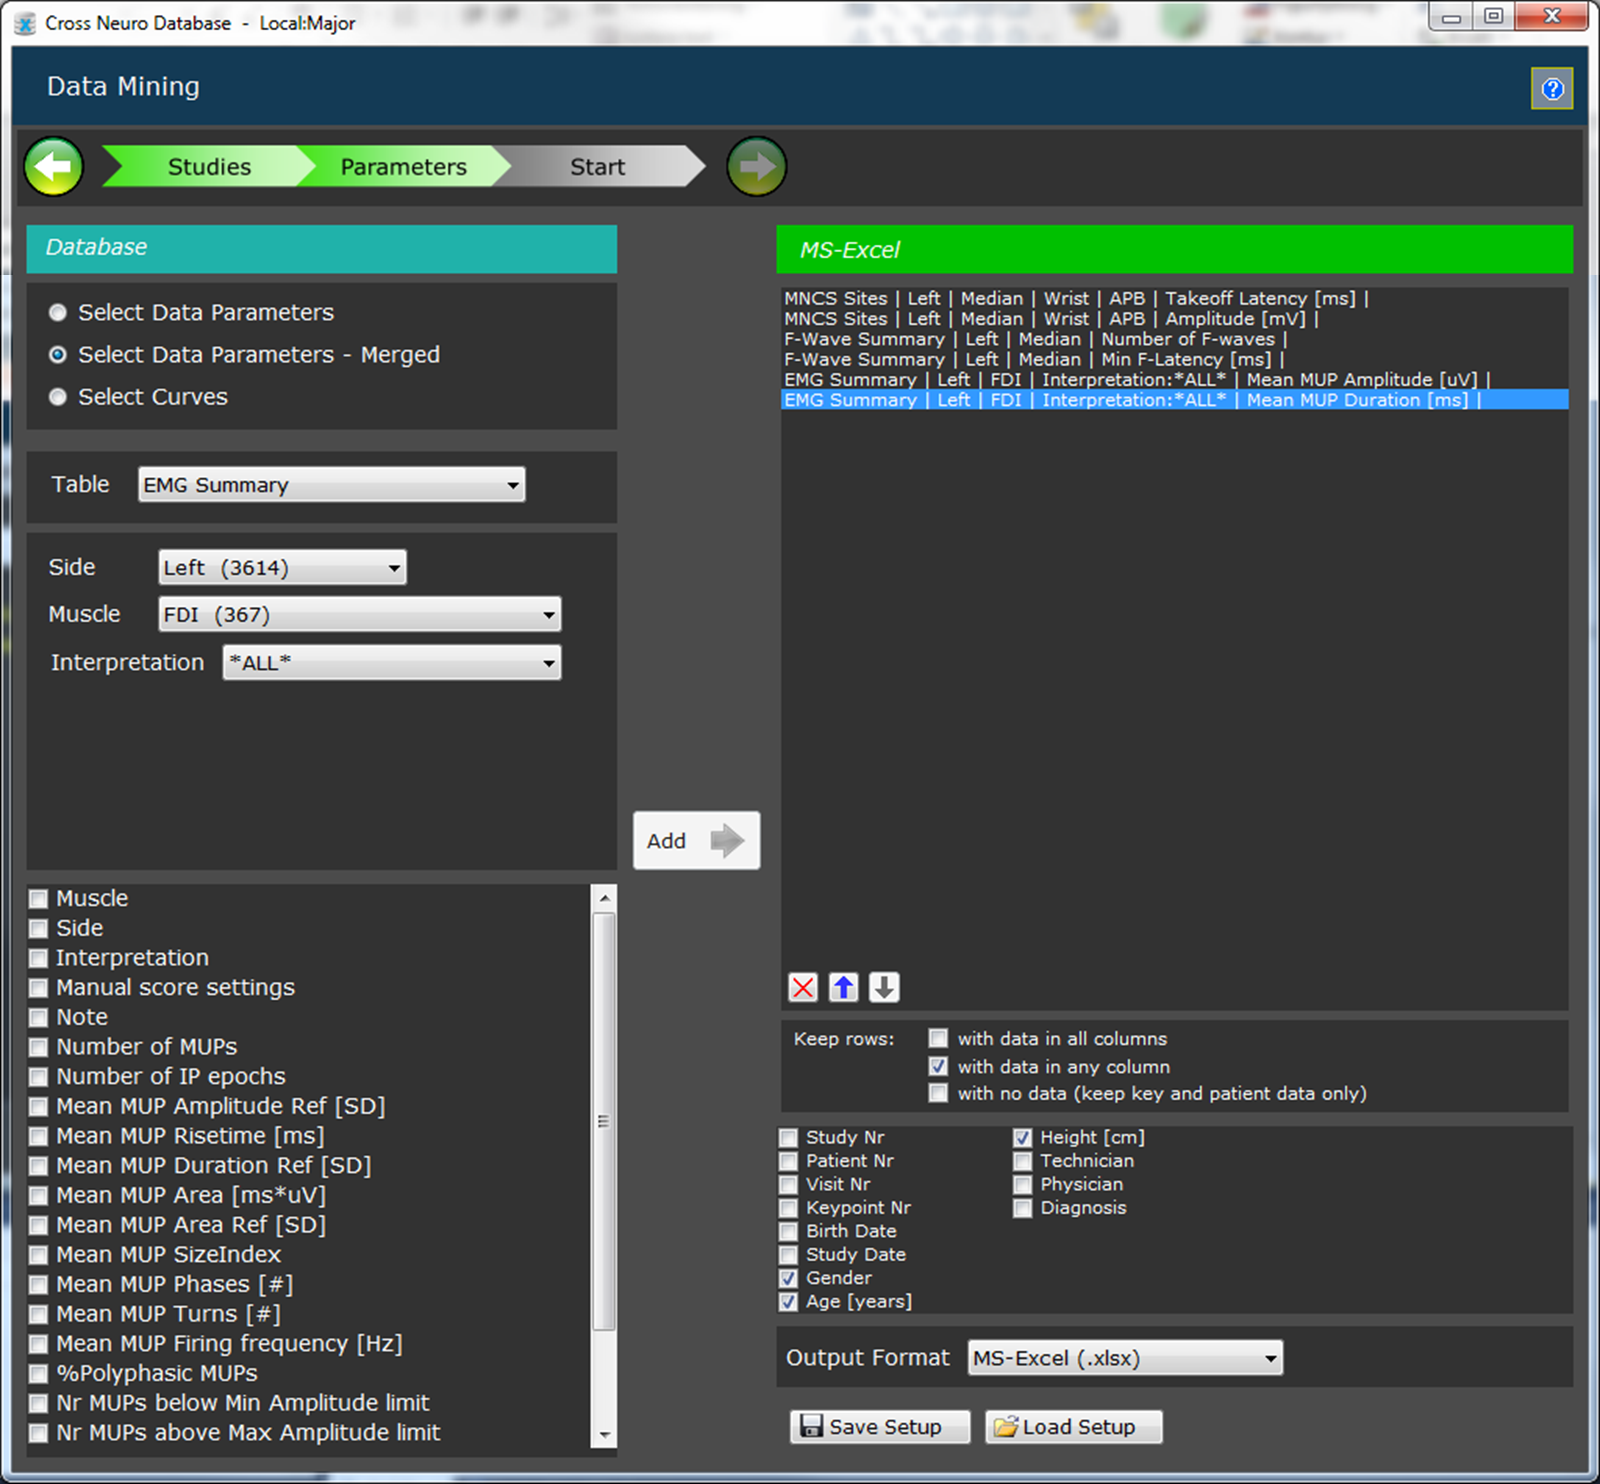
Left column:
- Select Table type
- Specify the anatomy filter settings.
- All fields must be inserted.
- All table rows matching the filter will be extracted.
- Select parameter(s) to be included. Click [Add] to save the filter.
Right Column:
- Topmost section shows all added parameters. Each parameter will result in one column in the output file.
- Use control buttons to delete and rearrange the parameters/columns.
- Select Keep rows filter rules.
- Data in all columns: Only rows with data in all columns will be included.
- Data in any column: rows with data in any column will be included. Fields with missing data will be grayed in the output file.
- No data: include all rows for selected patients, even if no measurement data is available. This mode is useful when merging output result files to get data from the same patient on the same row.
- Select additional patient data fields to be added to the output.
- To save time, use [Save Setup] to save current filter settings and [Load Setup] to load previously saved settings.
Click the green right arrow to Start Extraction (see below)
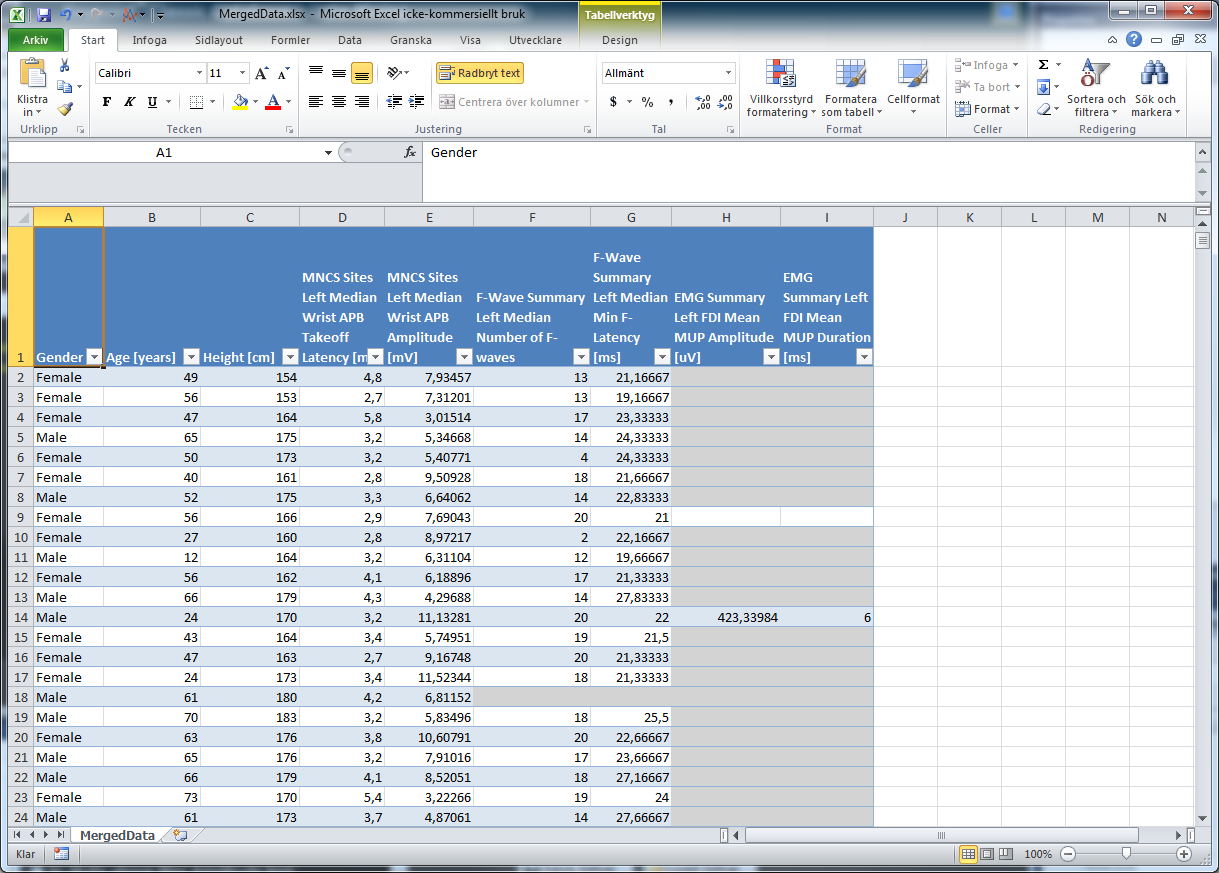
Below is an example of a Merged Data table. Grayed field indicates that no data were recorded for the patient/parameter.
Select Curves
Output will be curves from one or multiple test types.
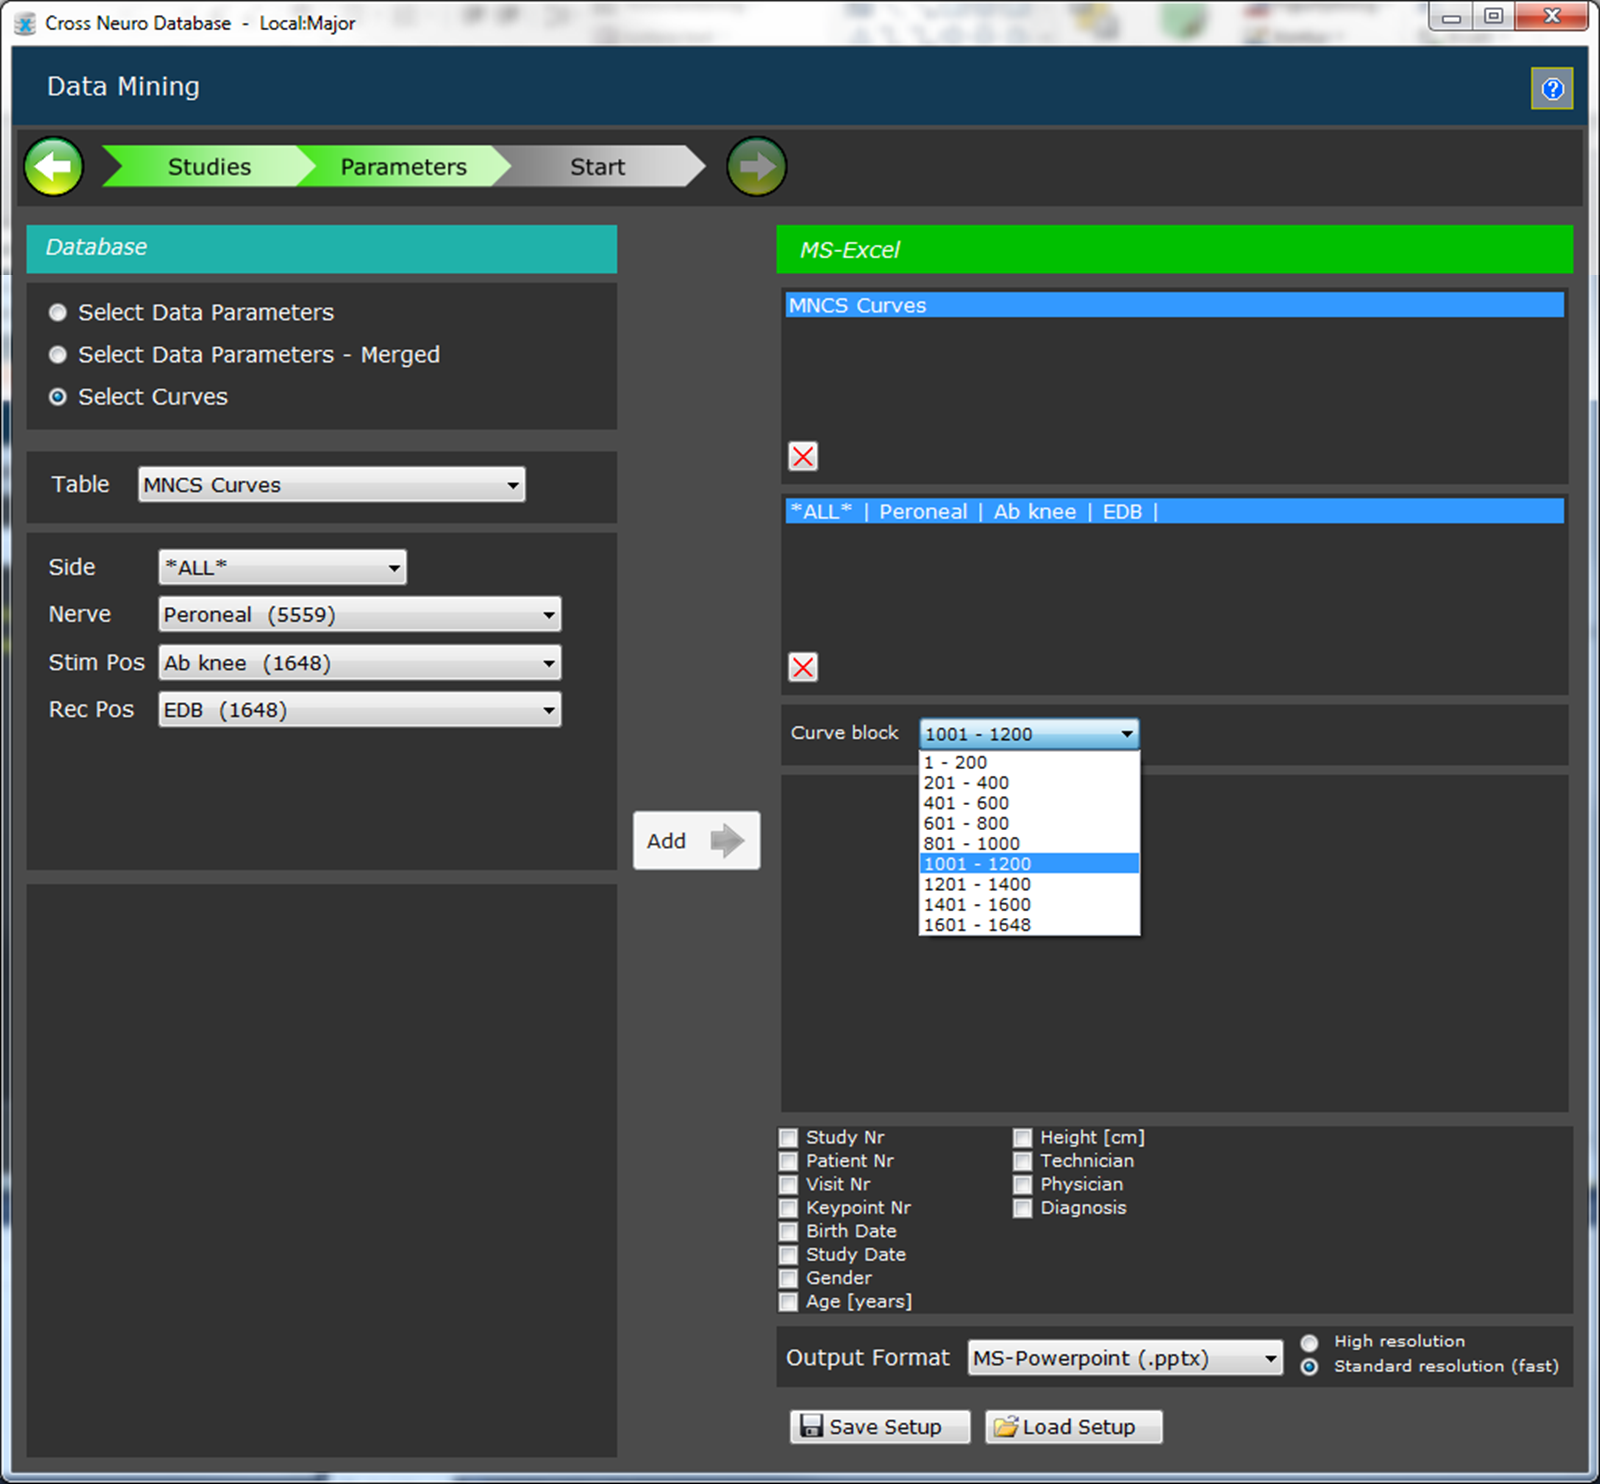
Left column:
- Select Table type
- Specify the anatomy filter settings.
Leaving a field empty or *ALL* means no filter.
All table rows matching the filter will be extracted.
- Click [Add] to save the filter.
Right Column:
- Topmost section shows all added data table types.
- The section below shows all anatomy filters for the selected table type.
- Select parameters for each table type to be included in the output.
- Select additional patient data fields to be added to the output.
- Select output format
- To save time, use [Save Setup] to save current filter settings and [Load Setup] to load previously saved settings.
Click the green right arrow to Start Extraction (see below)
An example of MS-PowerPoint output:
Sample values are saved in uV in MS-Excel output:
Start Extraction
Click
[Start], insert a project name and click
[OK] to start the Extraction.
The project name will be used as the folder name where all result files will be saved.
The default location for output results is: \MyDocuments\Cross Neuro Database\Results.
When the Extraction is completed, Windows Explorer will be displayed showing the result folder.
Double click on the result files to review the result.
If sensitive patient data is included in the resulting file, such as ID or name, the file will be password protected. The same password as for the database/login will be used.
To change it, please read about passwords for Excel file on the Internet.
A ReadMe.txt file is created and saved in the output folder. It contains information about which filter criteria etc. that was used for the extraction.
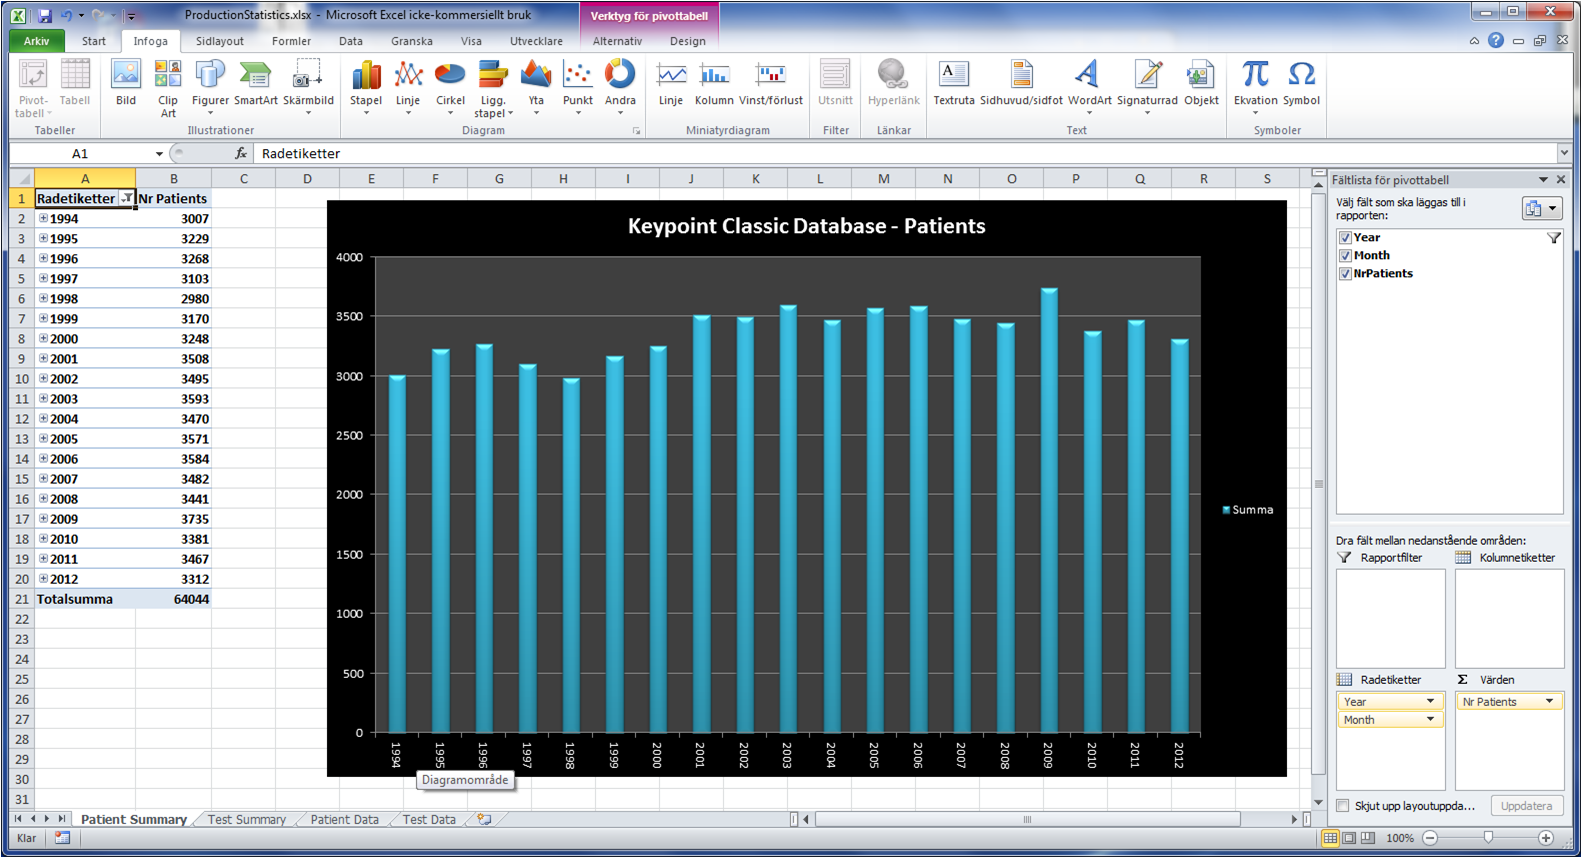
Select
Production Statistics in the Analysis window from the main menu.
Click
[Start] and select result output folder.
Detailed numerical results for patient and test statistics are saved on sheets 3 (Patient Data) and 4 (Test Data).
On sheet 1 (Patient Summary) and sheet 2 (Test Summary), Pivot tables and Charts are created automatically.
The Pivot table function in MS-Excel is very powerful and gives large possibilities to display and format data in various ways.
Please read more about “Excel Pivot tables” on the Internet.
A few examples are shown below.
Number of patients per year over many years:
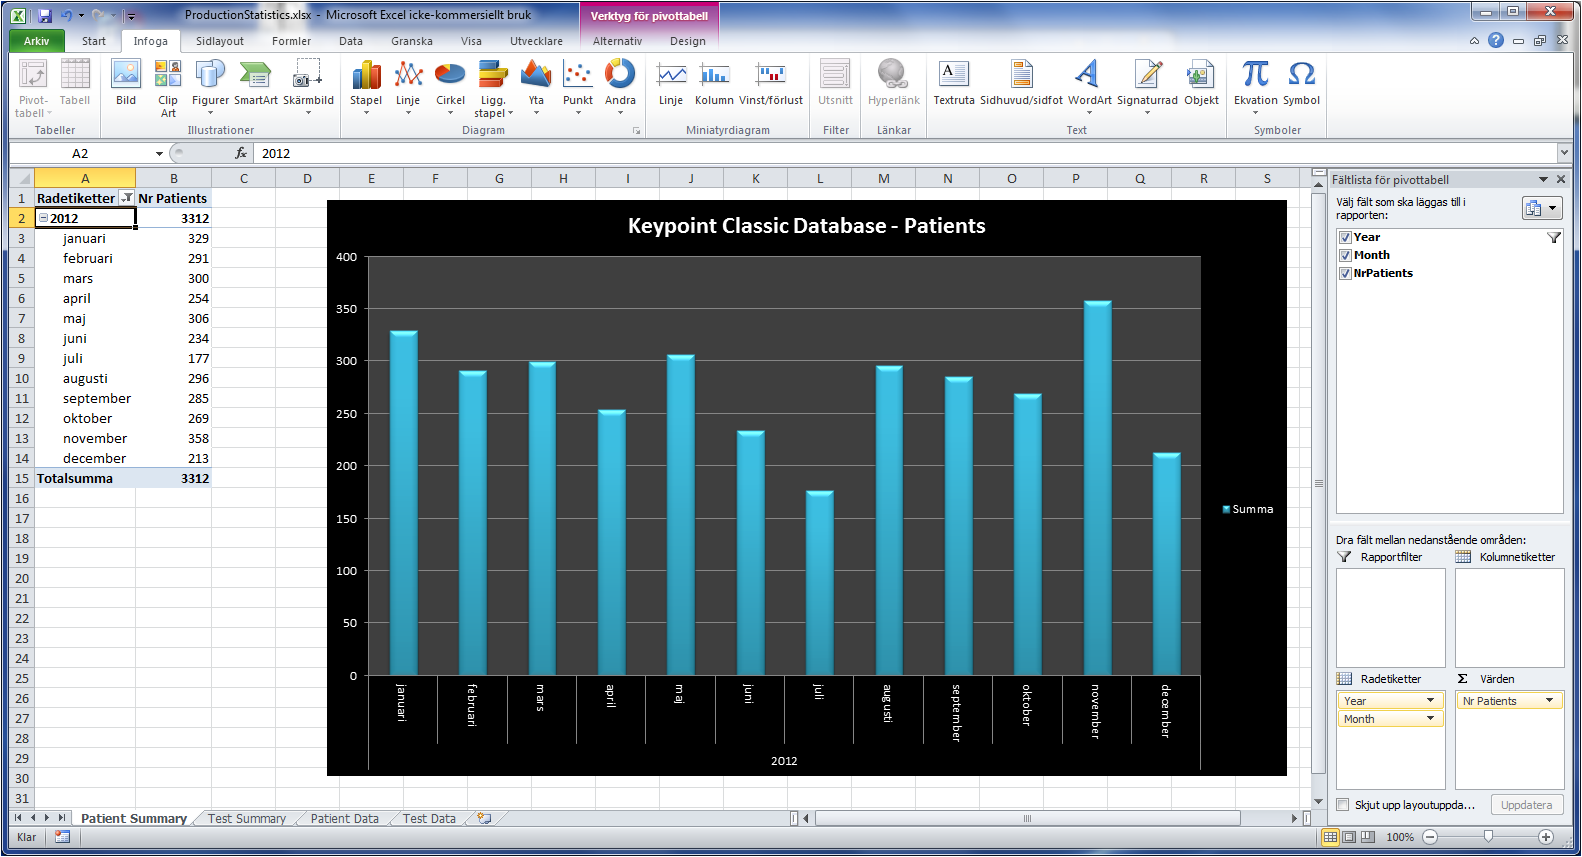
Number of patients per month for a selected year:
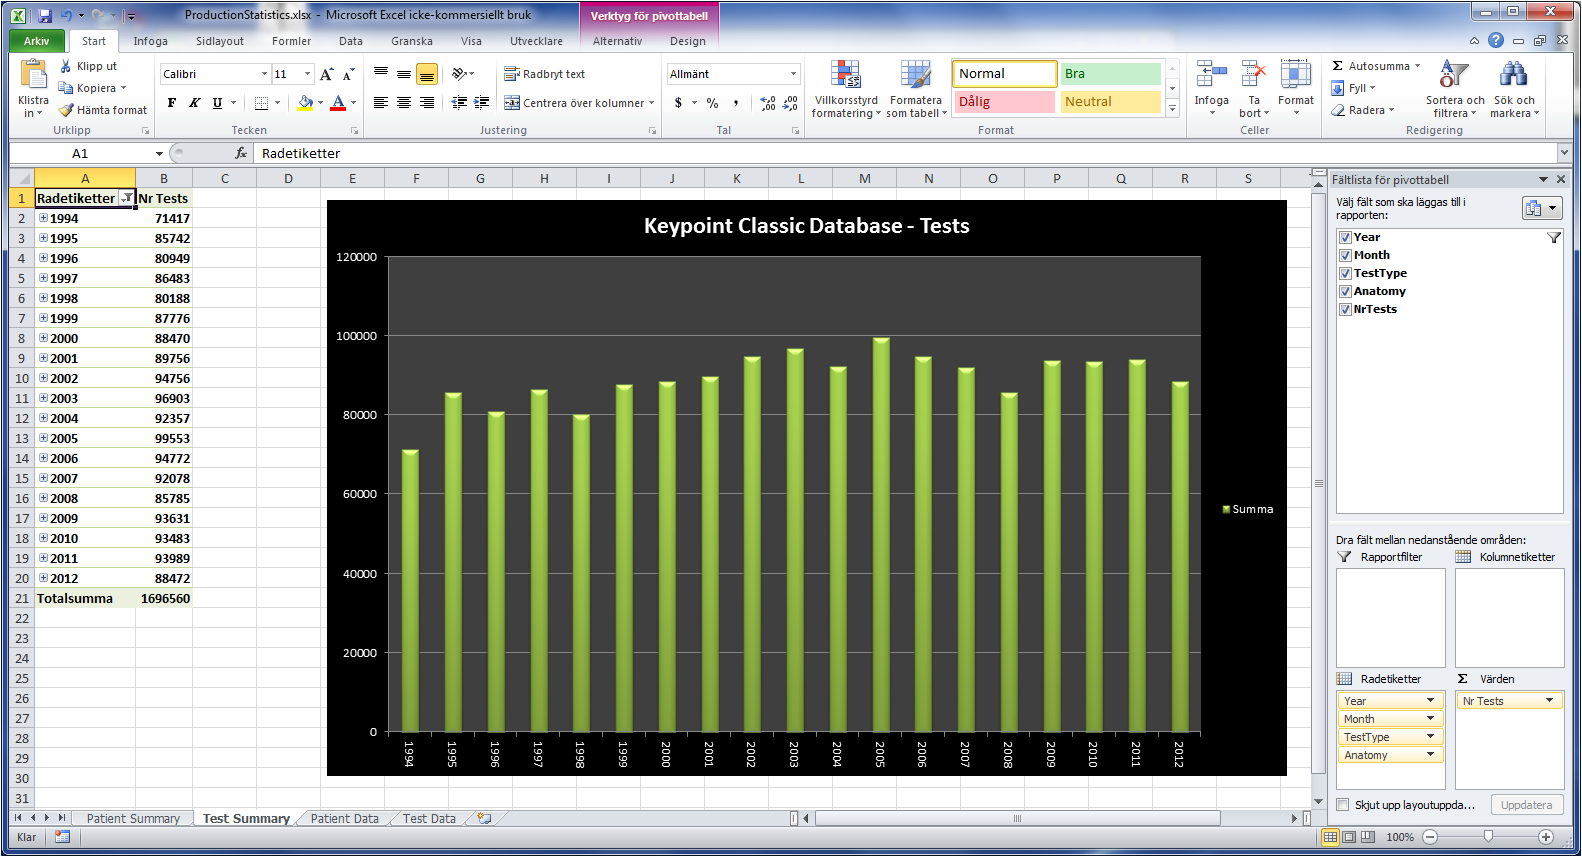
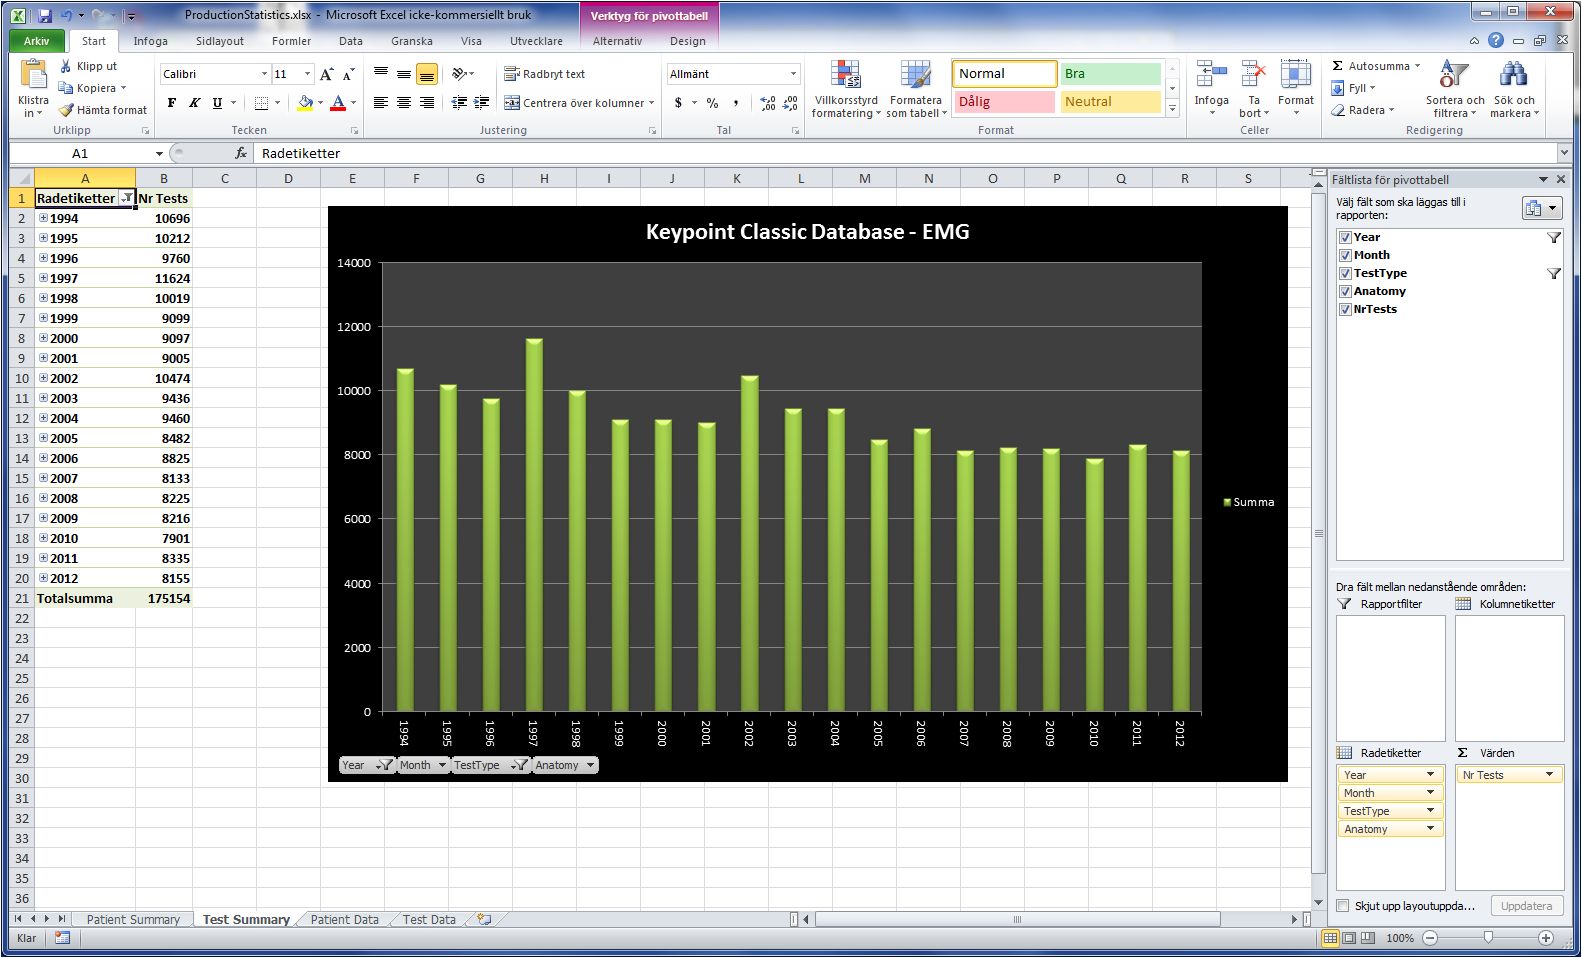
Total number of tests (EMG’s, MNCS’s….) over many years:
Total number of EMG’s over many years:
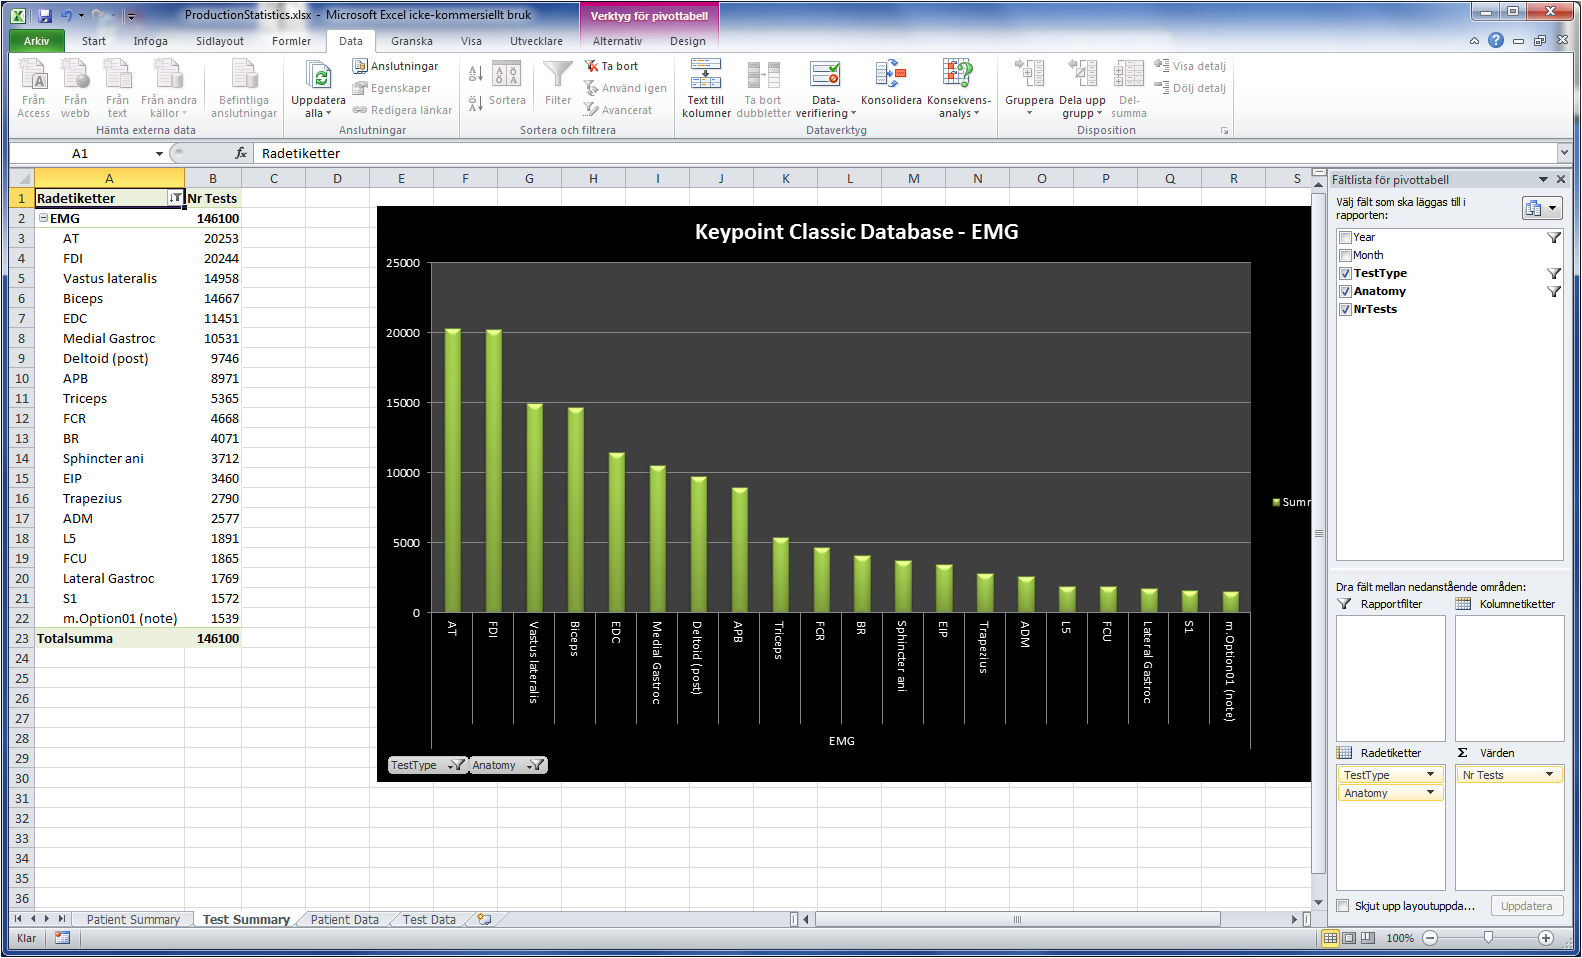
20 most commonly studied muscles:
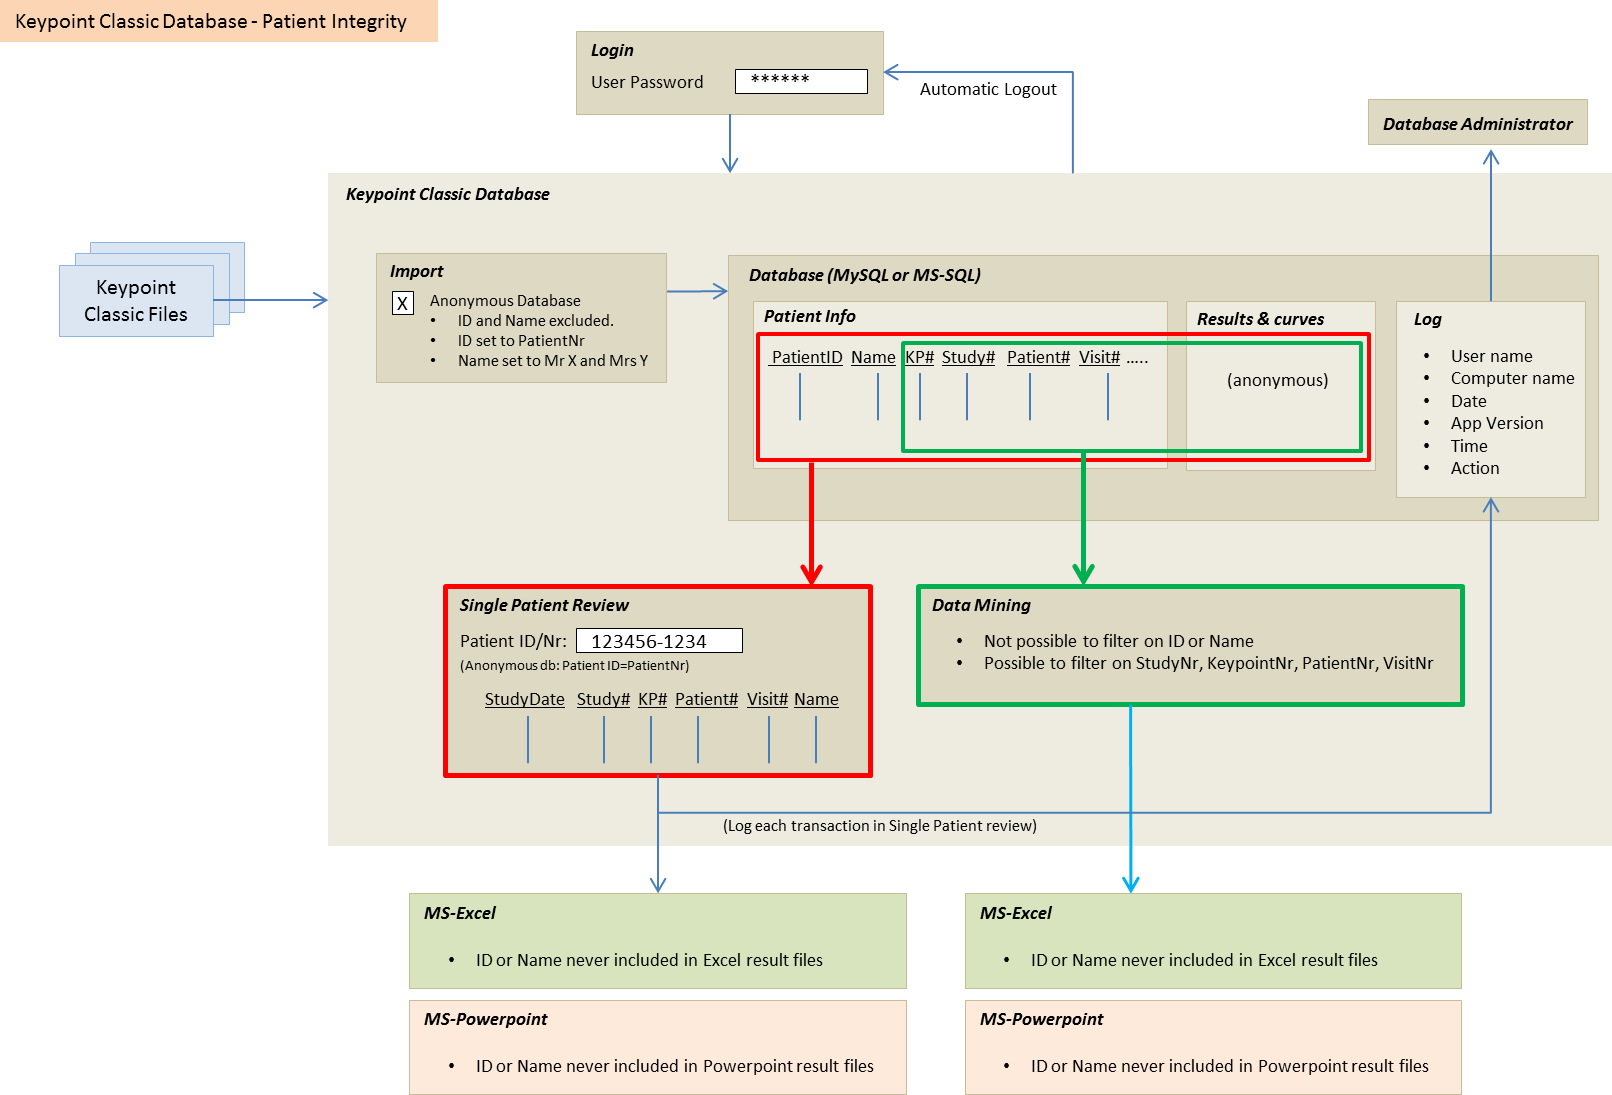
Patient integrity has high priority in a medical database system. To address this subject and maximize integrity while still have the required analysis features, the Cross Neuro Database has the following security/integrity features:
- Database password For a local database, define the password in Database Setup. For a remote server database, contact your IT-administrator.
- Automatic logout Specify the logout time under Options-Autologout Time.
- Anonymous Import Activate under Options-Anonymous. Patient name and ID will be excluded during the Import procedure. I.e. not physically available in the database. Patient name and Patient ID are set to blank.
- Anonymous Data Mining The output from Data Mining will never include Patient Name or ID in resulting MS-Excel® and MS-Powerpoint® files.
- Patient Filter Data Mining does not allow filter on name or ID.
- Patient Review Allows search on Patient ID, but will not include name or ID in any resulting files.
- Logging All searches in Patient Review will be saved in a hidden log-table inside the database.
| Files and folders |
Purpose |
| C:\program (x86)\Cross Neuro Database |
Application executable files |
| C:\program files\MySQL\MySQL Server 5.6\my.ini |
MySQL server settings. Edit Port number if default 3306 is already occupied. |
| C:\program files\MySQL |
MySQL server application |
| C:\program (x86)\MySQL\Connector ODBC 5.2 |
ODBC communication driver files |
| C:\program data\MySQL\MySQL Server 5.6\data\db# |
Local databases |
| C:\Users\[myName]\Documents\Cross Neuro Database\ParameterSetups |
Saved data Mining parameters files. |
| C:\Users\[myName]\Documents\Cross Neuro Database\LinkFiles |
Text files holding patient group lists. Edit using e.g. Notepad. |
| C:\Users\[myName]\Documents\Cross Neuro Database\Results\.... |
Output results from Data mining, Patients and Production statistics.
One folder per Extraction. One of multiple files depending on extraction type. |
| C:\Users\[myName]\Documents\Cross Neuro Database\Temp |
Temporary files used during Import. All files in this folder will be cleared. |
| C:\Users\[myName]\AppData\Local\Stalberg Software\Cross Neuro Database\Config.xml |
Settings files, holding current Options.
|
| C:\Users\[myName]\AppData\Local\Stalberg Software\Cross Neuro Database\SecurityConfig.xml |
Security files.
|
| C:\Users\[myName]\AppData\Local\Stalberg Software\Cross Neuro Database\importlog.txt |
Log file for latest Import.
|
| C:\Users\[myName]\AppData\Local\Stalberg Software\Cross Neuro Database\PatientReviewConfig.xml |
Settings files, holding current Patient Review Options.
|
| C:\Users\[myName]\AppData\Local\Stalberg Software\Cross Neuro Database\mu.dat |
Muscle name list. Replace this file with C:\KP\SysData\mu.dat if changes have been made in Keypoint Classic.
|
| C:\Users\[myName]\AppData\Local\Stalberg Software\Cross Neuro Database\nrv.dat |
Nerve name list. Replace this file with C:\KP\SysData\nrv.dat if changes have been made in Keypoint Classic.
|
- Windows 7/8/10
- Microsoft .NET framework, version 4-Full or later
- MS-Excel 2007,2010 or later. Office365 does not work.
- MS-PowerPoint 2007, 2010 or later. Office365 does not work.
- Internet connection for online Activation and Help
To use SQLite:
- No additional server or drivers are required.
To use MySQL:
- MySQL Server application, local or remote.
- MySQL ODBC driver
To use MS-SQL:
- MS-SQL Server application, local or remote.
- MS-SQL ODBC driver
- Microsoft SQL Command Line Utilities program (bcp.exe)
To Import Keypoint.Net data:
- The KPIS service must be installed and running on the same client as running the Import function.
- CrossNeuroDatabase report template must be added to Keypoint.Net